Wondering how to start a blog with Bluehost? No worries! I also have been there.
To help you out, I’m putting all my blogging learnings and experiences in this guide.
No doubt! It’s a very long guide but if you want to start a successful blog, then look no further and continue reading. Keep in mind that only learning will not help you if you’re not taking action to start your blog.
Are you ready to take action to start your blog?
Perfect! Let’s deep dive into how to start a blog with Bluehost.
- How To Start A Blog With Bluehost?
- Step 1- Plan Important Things For Your Blog
- Step 2: Choose the Best Tools to Bring Your Blog Online
- Step 3 – Purchase Bluehost Hosting and Get Your Free Domain
- Step 4 – WordPress Installation & Navigate to Your WordPress Dashboard
- Step 5 – Clean Your WordPress Dashboard
- Step 6 – Set up WordPress Settings
- Step 7 – Choose, Install, and Customize Your WordPress Theme
- Step 8 – Design Your Blog
- Step 9 – Install the Necessary Plugins
- Step 10 – Organize Your WordPress Blog
- Step 11 – Create Pre-launch Pages
- Step 12 – Create Your First Blog Post
- Step 13 – Launch Your Blog
- Step 14 – Submit Your Blog to Search Engines and Other Tools
- Step 15 – Next Steps To Grow Your Blog
- Final Thoughts on How To Start A Blog With Bluehost
How To Start A Blog With Bluehost?
Following are the lists of steps that we are going to cover in this ultimate guide
- Plan Important Things For Your Blog
- Choose the Best Tools to Bring Your Blog Online
- Purchase Bluehost Hosting and Get Your Free Domain
- WordPress Installation and Navigate to Your WordPress Dashboard
- Clean Your WordPress Dashboard
- Set up WordPress Settings
- Choose, Install, and Customize the WordPress Theme
- Design Your Blog
- Install Necessary WordPress Plugins
- Organize Your WordPress Blog
- Create and Publish Pre-launch Pages For Your Blog
- Create and Publish Your First Blog Post
- Launch Your Blog
- Submit Your Blog to Search Engines and Set up Tools
- Next Steps to Grow Your Blog
Excited? Perfect! Let’s jump into it!
Step 1- Plan Important Things For Your Blog
The first and most important step is planning things before starting a blog. Perfect planning has the power to create a successful blog. If your planning is not efficient enough, then it may lead to complications or unhappy blogging results.
Want to drive fruitful results from your blog? Then manage quality time and plan your blog.
So, ask the following simple questions yourself:
- What will be the niche of your blog?
- What will be the name of your blog?
- Which monetization methods you’ll use to generate income from your blog?
- What plan will you follow to take your blog to the next level?
If yes! Then great, you can skip this step and jump to the second step. If you have not done the planning, then let’s do this first.
1.1 Choose Your Niche
The success of your blog depends on your niche as well. Niche is a topic around which you want to create your blog. Before creating your blog, decide on your niche.
There are many examples of niches, such as education, career guidance, making money online, sports, health, food, fitness, technology, digital marketing, and many more.
But how will you decide your niche?
So, here is a quick answer.
If you’re just creating a blog for your fun or passion, then no need to learn much about picking a niche. You can simply create a blog on a niche in which you’re interested.
But if you want to make money out of your blog, then you should learn how to pick a profitable niche.
Simply ask the following three questions from yourself?
Are You Interested in the Niche?
Make a list of topics on which you want to make your blog and then explore which topic you enjoy writing about. Because if you are not interested in the niche, then after some time you may lose interest in your blog.
So, choose a niche in which you enjoy writing to take your blog to the next level.
Are Other People also Interested in Your Niche?
After selecting a niche as per your interest, find out if other people also enjoy reading that niche. If no one is interested in your selected niche, then there is no point in creating a blog. Because you will not get an audience who can read your content.
If there is no audience means you will not get traffic and without traffic, you can’t make money from a blog.
You can do market research to figure out whether there is an audience for your selected niche or not. You can use tools like Kwfinder, and Google Trends to check how many people are searching about your niche.
If there is search volume, then people are also interested in your niche as well and it means you can get traffic to monetize your blog.
Is Your Niche Monetizable?
The next and most important point is to check the market value of your niche. Making money from a blog is possible, but every blog does not generate the same money.
But why?
Because your niche has the power to decide how much money you can make out of your blog.
A blog that has profitable niches makes more money compared to other blogs.
To find whether your niche is monetizable or not, check your competitors’ websites and analyze how they are making money and how much income they are generating from a blog. If they are making money from your niche, then you too can make money because you both are in the same niche.
I hope now you can easily figure out your niche.
1.2 Choose the Perfect Name for Your Blog
After choosing a niche, decide on the name of your blog. Using a name, people will recognize your blog and it plays an important role in branding. Here are some tips which can follow to choose a perfect name for your blog:
- Keep it short and simple so that people can easily remember it.
- Don’t use over 2 or 3 words (like Google, Facebook, and YouTube are the names of the most famous brands which contain only a single word).
- The name of your blog should represent the goal of the blog. Choose a name that exactly represents what your blog is all about. Let’s take the example of “LearnWithKaur”, and this name indicates that you can learn something with Kaur.
- Look at your competitor’s websites and get some ideas for your blog. Never copy their name, create your unique name to get out of the crowd.
Step 2: Choose the Best Tools to Bring Your Blog Online
Are you wondering which tools you need to start a blog?
Well! You just need 3 basic tools to bring your blog online, i.e. hosting, domain name, and blogging software. So, let’s choose the best tools to bring your blog online.
2.1 Hosting
The first thing that you need to bring your blog online is hosting. Let’s briefly understand what hosting is.
If you want to run your offline business, then you need a space where you can launch your business. In the same way, if you want to make your website or blog live on the internet you need a space on the web.
Hosting provides you space on the internet where you can store your blog, its files, and data.
Now from where can you get hosting for your blog?
Well! There are several hosting providers which provide hosting services. But the question is how will you decide which one is best for you?
The best hosting is one that provides you with the necessary features within your budget.
But which factors make hosting best?
Simply the best hosting is one that provides outstanding performance and comes with all required features such as enough storage, affordable, free add-ons such as domain, SSL & professional email, a great authority in the market, and excellent customer support.
Luckily, Bluehost hosting is one that comes with all of these features and I also have a great experience with Bluehost hosting.
Why Bluehost Hosting?
There are several reasons for choosing Bluehost hosting, and here are some highlights:
High Authority
Bluehost is the leading hosting provider and WordPress itself recommends it. Over one million websites are using Bluehost hosting all over the world.

Affordable Plans
Bluehost offers you the most affordable hosting plans. And you can buy hosting for your blog, without making a hole in your pocket. If you’re just starting your blogging career, then you can choose the Bluehost basic plan which is the most affordable plan and comes with all the required features.
Free Ads-Ons
Bluehost hosting comes with many free add-ons that you can freely use without paying extra money. Here is a list of free add-ons:
- One free domain for the first year and it means you don’t need to buy a domain name separately [No need to pay for a domain with Bluehost hosting].
- A free SSL certificate to secure your website.
- Free CDN (CDN is a content delivery network, and it stores copies of your blog in multiple locations globally so that people from other countries can access your blog quickly.
- Free professional emails for your business (like admin@yourdomain.com)
Automatic WordPress Installation
WordPress is the best blogging software to build, manage, and create a blog. So, Bluehost provides automatic WordPress installation, and you do not need to install it manually. Bluehost will automatically install WordPress for you within a few seconds.
24 x7 Customer Support
Bluehost provides you 24/7 customer support and you can directly get in touch with them via phone call or chat in case you face any difficulties with your blog.
Bluehost provides wholehearted support because whenever I face any tech issue with my blog, I directly reach out to the Bluehost support team. And they solve problems on a priority basis.
That’s why Bluehost hosting is the best and most popular hosting all around the world.
2.2 Domain Name
A domain name is the address of your blog and by using it, anyone can find your blog on the internet. Blogging is an online business and to run this you need a unique address so that users can find your blog.
For example, the domain name of Google is google.com and YouTube is youtube.com. Whenever you search for google.com and youtube.com, it directly lands you on Google and YouTube, respectively.
Pick a perfect domain name for your blog that your audience can use to easily find your blog. Following are some tips that you can keep in mind while choosing a domain name for your blog:
- Always use top-level domains such as .com, .edu, .org. Based on the purpose of your blog, you can pick a domain, and “.com” is the most popular domain name.
- Try to buy a domain name that includes the name of your blog.
- Every blog has a unique domain name and no two blogs can have the same domain name. Here is how you can check the availability of your domain name:
- Visit this link, enter your desired domain in the search bar, and select the domain name such as .com.Edu or.Org.
- If anyone else has already taken the domain, you will see a notification that the domain is unavailable. But no need to worry because along with this message, Bluehost will also show you other related available domains and you can pick one which fits best your needs.
Pricing of Domain Name:
The price of a domain name can vary from platform to platform. But you do not need to pay for a domain name when you choose Bluehost hosting. With Bluehost hosting, you will get one free domain for one year.
Blogging Software(CMS)
CMS stands for content management system or simply you can say blogging platform. Using CMS software, you can easily build, design, and manage your blog without touching a single line of code.
There are several blogging platforms that you can use for creating, designing, and managing your blog. But out of all these blogging software, WordPress is the most popular blogging platform.
But why WordPress?
WordPress is free blogging software and using it you can quickly create, design, and manage any type of website, whether it be a blog, e-commerce store, business, or startup website.
Here is why WordPress is so popular:
- Open-source blogging platform.
- Easy to use and beginner-friendly blogging software.
- You can create outstanding websites without touching a single line of code.
- It comes with various tools, themes, and plugins that you ever need to create a professional blog or website.
- You can customize its settings as per your needs and requirements.
- It is a secure platform and no need to worry about the security of your blog.
- You can easily optimize your blog for SEO to drive more organic traffic.
- Using WordPress, you can choose any monetization method to generate income from your blog. There is no restriction at all.
There are many more benefits of using WordPress, but these are the key features that you need to run a successful blog, and thankfully all of these features are available in the WordPress software.
One more important thing that you need to know is, that there are two platforms named WordPress.
Yes! It is true
WordPress.com and WordPress. Org
Both these platforms are different.Wordpress.com is not recommended, as it doesn’t provide you with full-customization access and you have to pay for this. So, I only recommend WordPress.org as it is a self-hosted platform, and gives you full freedom and flexibility to control your blog.
Important Note!
Guess what if you choose Bluehost?
Then you only need to buy hosting, because it offers you a free domain name for your blog. The blogging software WordPress is open-source which Bluehost will automatically install for you. So, it means you can start your dream blog by just buying Bluehost hosting.
Step 3 – Purchase Bluehost Hosting and Get Your Free Domain
Now you know what things you need. Your next step for how to start a blog with Bluehost is to purchase hosting and grab your free domain to bring your blog to the internet.
Are you ready? Perfect, let’s follow these steps with me!
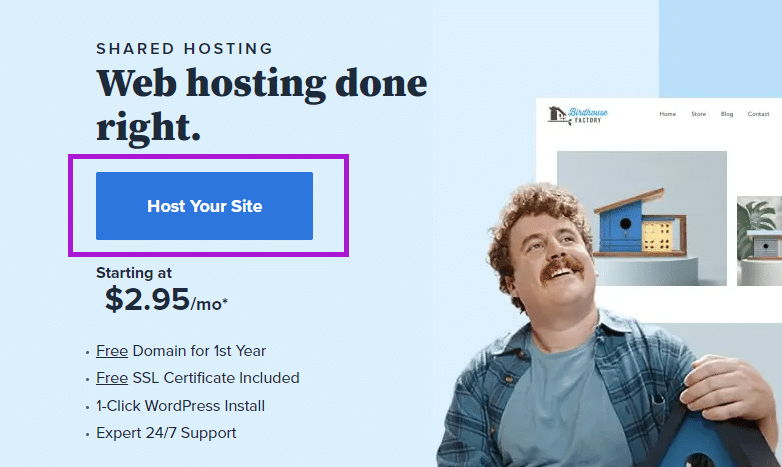
Visit Bluehost and click on the “Host Your Site or Get Started” button.
Choose a Perfect Hosting Plan
On the next page, you will see four plans to host your site. Select one that best fits your needs and budget. Let’s briefly discuss these plans.

Basic Plan: This plan is the most affordable and it will cost just $2.95/month when you pay yearly. With this plan, you can host only one blog or website. So, if you’re just starting your blogging career and initially want to start one blog, then purchase a basic plan.
Plus Plan: If you want to run multiple websites or blogs, then this plan can be a perfect fit for you. With this plan, you can host unlimited websites by just paying $5.45 per month when you pay annually.
Choice Plus Plan: This plan also allows you to host unlimited websites. The only difference is you will get privacy and security features in this plan, but not in the Plus plan. So, if you’re more concerned about the privacy and security of your blog, then you can purchase a choice plus plan and it will cost you around $5.45 per month when you pay yearly.
Pro Plan: This plan gives you more optimized web resources. If you want more advanced features, then the pro plan can be the perfect solution for you. It will cost you $13.95 per month when you pay annually.
Personal Recommendations to Choose a Perfect Plan
When I started my first blog, I selected a basic plan because by paying less we could make our dream blog. Now, I upgraded to the Choice Plus plan because with this plan I can run multiple websites.
If you’re just starting your blogging career, then a basic plan is perfect for you because you can bring your first blog online with a small investment.
Once you will start earning from your blog and you want to launch more websites or blogs, then you can switch to a plus or choice plus plan. But in the initial stage, the basic plan can fit your needs and budget.
Click on the select button to purchase your hosting plan.
Have you selected your plan? If Yes! then you can move ahead to get your free domain. Otherwise, firstly select your plan and jump to the next step along with me.
Get Your Free Domain
As we have discussed earlier, with Bluehost hosting, you will get one free domain for one year. Now it’s time to grab your free domain.
Excited? Sounds great!
After selecting a plan, you’ll see a page from where you can get your free domain.

If you already purchased the domain from any other provider, then you can enter it in the second box.
Otherwise, just create a domain for your blog. While creating your domain name, keep important tips in your mind that we have discussed earlier.
If you want to take some time to create your domain, then you can also do it later. For this, simply click on “I’ll create my domain later” and it will bring you to the next step.
Otherwise, you can enter the domain name that you want to get and then click on the “Next” button.
Enter Account Information
Your next step is to create your official account with Bluehost. All you need to do is enter your personal information, as shown in the below snapshot.

Choose Your Package Information and Package Extras
First, select an account plan. You can either choose a 12-month or 36-month plan. The best thing about choosing more months is you can lock the price for upcoming years.
So, choose either 12 or 36 months and it will show you the total hosting price and time duration.

Here you will see one more thing, i.e. Let’s encrypt SSL and it means Bluehost will provide you with a free SSL certificate. So, if you don’t know what SSL is, then let me quickly explain it to you.
SSL stands for secure sockets layer and it is a security certificate that helps you to create a secure connection for your blog.
Whenever we visit any website, then you might see a padlock just before the URL of the website. It simply shows that the website has an SSL certificate and you can browse this website securely.
Otherwise, if your website has no SSL certificate, the user will get a notification that your website is unsecure and they might leave your website because no one prefers to compromise their privacy or security.
So, with Bluehost, you will get this SSL certificate for free and you don’t need to worry about it.
Package Extras
These are additional things that you can buy along with your hosting.
These packages will cost you extra money, but these are not compulsory things to run a blog. I purchased no package extras so far. So, you can also untick all these extras from your purchase.

Enter Your Payment Information
The next step is to make your payment to get your hosting. For this, scroll down your page and after package extras, you will see the payment information section. Choose your preferred payment method and make your payment.

Finish Bluehost Hosting Purchase Process
Read the terms and conditions, check the box, and click the submit button.

Congratulations! You have purchased hosting for your blog, and now you can create and design your dream blog.
Create Your Bluehost Account
On the next page, click on the “Create New Account” button. This will redirect you to a new page where you can create your Bluehost account.

Enter the domain name of your blog and create a new password for your Bluehost account.
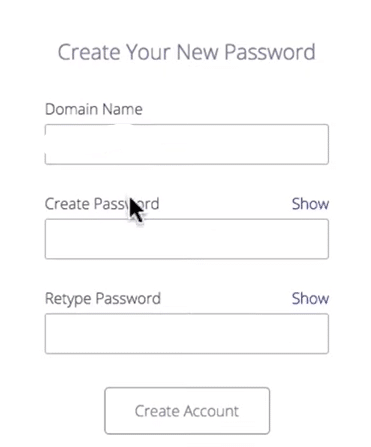
Check the box next to “You’ve read all terms and conditions” and then finally click on the “Create Account” button.
Important Note: Remember this username and password or save it in a safe place. Whenever you want to access your Bluehost account, enter this username and password.
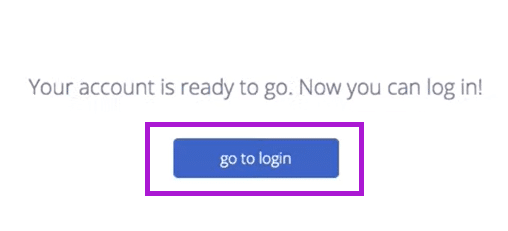
Now, you’ll see a “Go to Login” button on the next page, and click on it.
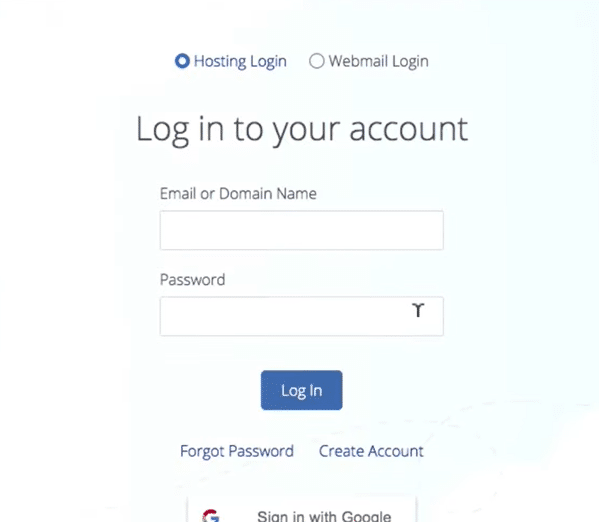
Now enter your username and password you have just created with Bluehost. Click on the “Login” button.
Bluehost Onboarding Process
Bluehost provides you with a quick and easiest onboarding process and, with this, you can quickly create your blog, without putting in much effort. After creating your account, Bluehost will directly bring you to the onboarding process.
To start this, scroll down the page, and click on the “Create Your Website” button.

Bluehost will suggest website creation steps, but we can do it from the WordPress dashboard as well. So as of now, you can skip these steps.
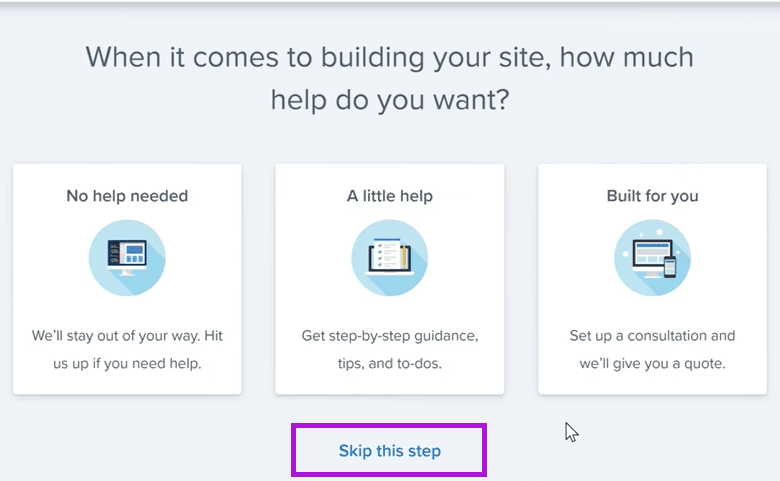
First Bluehost will ask you how much help you want and click on the “Skip” button.
Next is what kind of website you’re creating, you can click on “Skip this Step”.

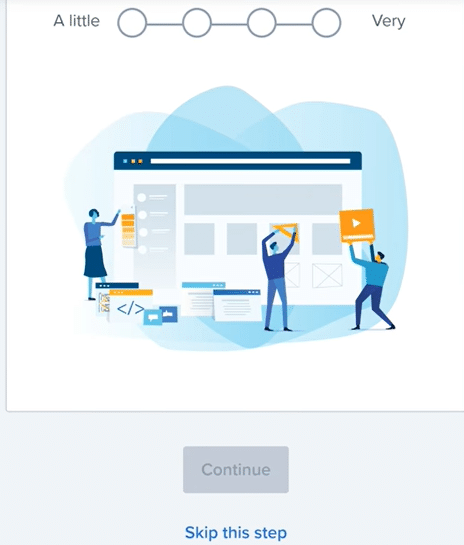
The next question is, are you comfortable creating a website? You can “Skip this step” as well.
In the next question, Bluehost will ask you how you want to create your website and gives you two options, i.e. WordPress and Bluehost website builder.
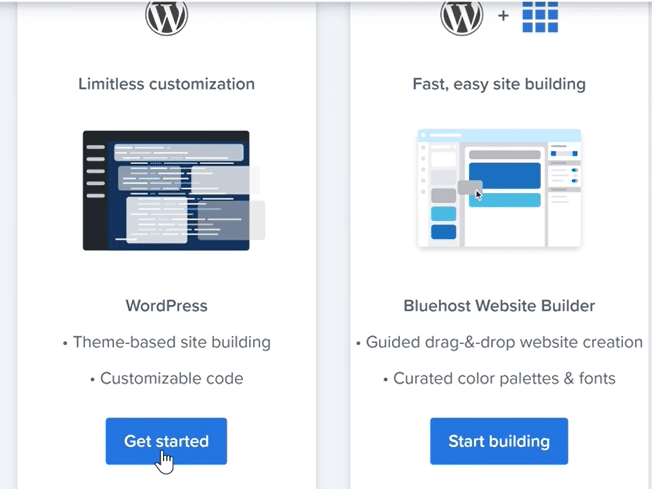
Choose WordPress because it will give you unlimited customization features and full control to create your blog. So, choose WordPress and click on the “Get Started” button.
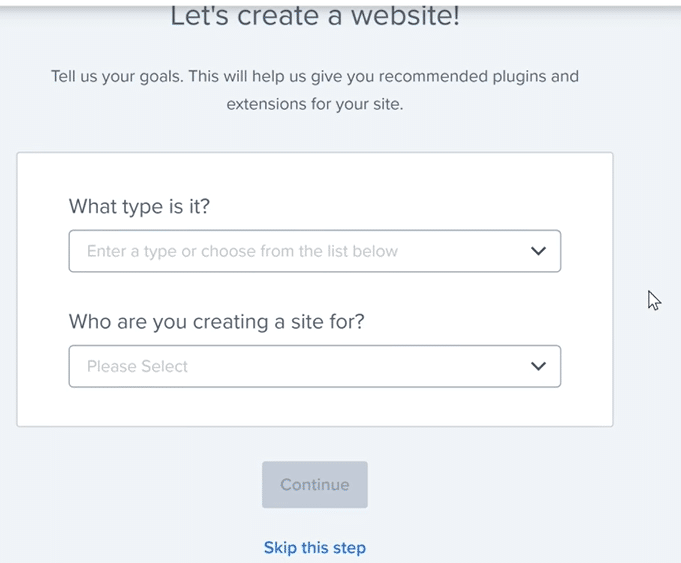
On the next page, Bluehost will ask you about your blog, so you can skip this step. And we will do it later.
Next, Bluehost will ask for the name and tagline of your website, so enter your blog details.
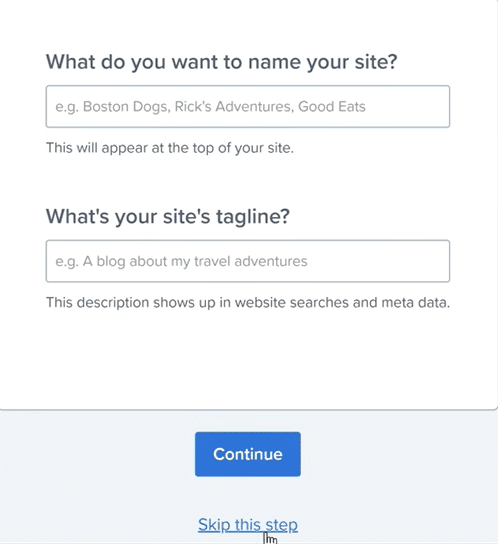
You can change these details anytime from your WordPress dashboard. And in the upcoming steps, I will show how you can do that. As of now, just enter the name and tagline of your blog and hit the “Continue” button.
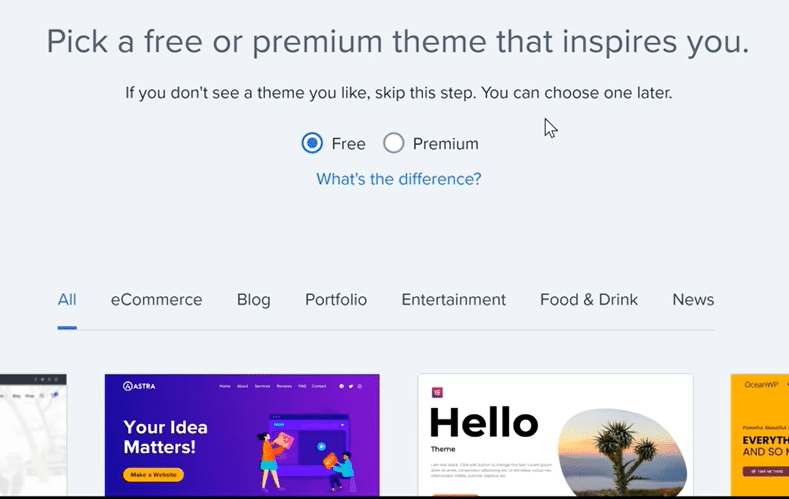
Bluehost will show you a list of WordPress themes, so skip this step. We will do it later.
Step 4 – WordPress Installation & Navigate to Your WordPress Dashboard
After the above step, Bluehost will auto-start WordPress installation. So you don’t need to do it manually. All you need to do is wait for a while and Bluehost will do it for you.
After installing WordPress, Bluehost will show your WordPress credentials. Grab your Admin URL, username name, and password, and remind or save them in your browser. The Admin URL is the URL of your WordPress dashboard.
Whenever you want to access your WordPress, use the admin URL and enter your username and password to access WordPress.
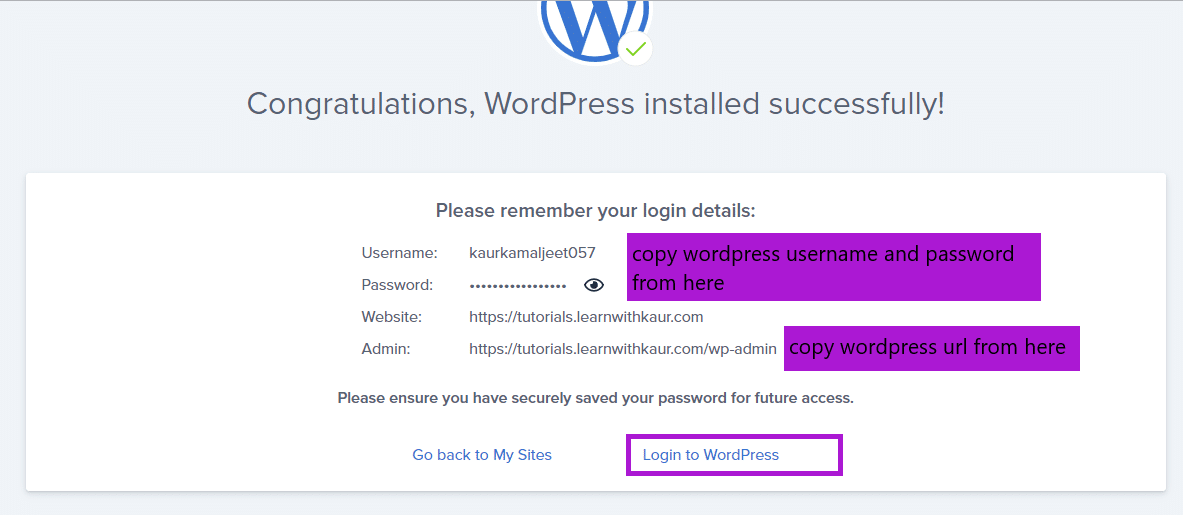
You can hit the “Go back to My Sites” button and this will bring you to the Bluehost dashboard from here, you can manage the backend.
And to quickly navigate to your WordPress dashboard hit the “Login to WordPress” button.
Verify Your Bluehost Account
Bluehost will send you an email on your registered email ID, so log in to your email and open the Bluehost account verification email.
Following is a sample email, and this is what your verification email looks like. From here, click on “Verify your email” and complete the verification process.
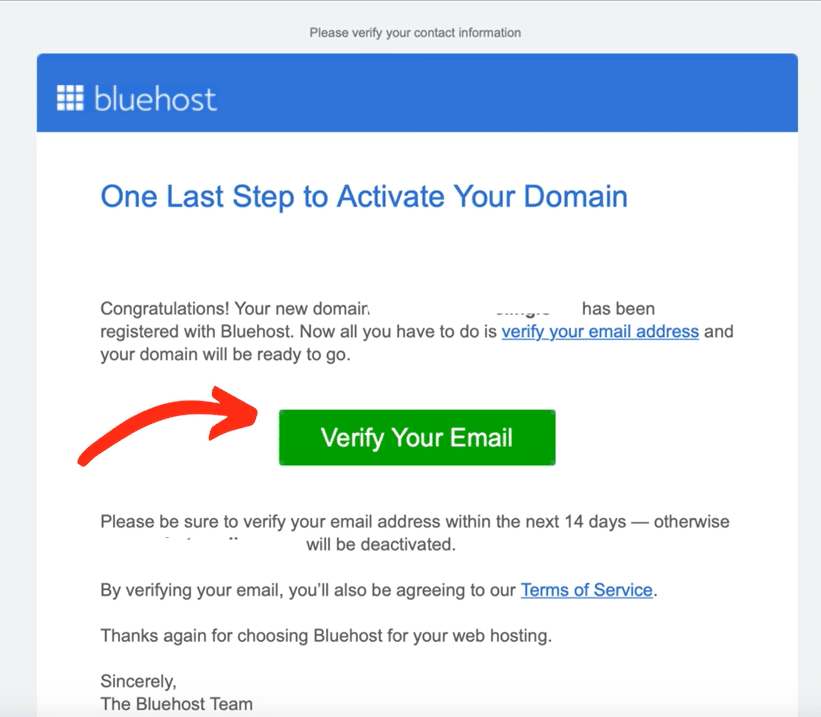
Well done! Now your Bluehost account is ready to use.
Step 5 – Clean Your WordPress Dashboard
After visiting WordPress for the first time, your first step is to set up and clean your WordPress dashboard. So, Let’s have a look at how you can do that!
By default, WordPress comes with some sample pages, plugins, themes, and comments. So first delete all these unnecessary things. Because I will show you how you create pages, and posts and install the required themes and plugins.
Delete Sample Pages:
- Navigate to your WordPress dashboard and select “Pages” from the left bar.
- Now you will see sample pages, hover over pages, and select “Trash”.
- Go to the “Trash” menu, hover over pages, and click on “Delete Permanently”.
Perfect! Now all sample pages will be deleted from your blog.
Delete Sample Post:
- Navigate to your WordPress dashboard and select “Posts” from the left bar.
- Now you will see sample posts, hover over a post, and select “Trash”.
- Go to the “Trash” tab, hover over the post, and click on “Delete Permanently”.
Perfect! Now sample posts will be deleted from your blog.
Delete Pre-installed Plugins
Many pre-installed plugins are not required, and we will install the required plugins in the next steps. Too many plugins can affect the speed of your blog so make sure you use no extra plugins. Let’s have a look at how you can remove pre-installed plugins:
- Navigate to your WordPress dashboard.
- Select “Plugins” from the left-sidebar and go to “Installed Plugins”.
- Select all the plugins (apart from the Bluehost plugin) by clicking on the box next to the plugin, as you can see in the following snapshot.
- Open up the bulk action menu, select “Deactivate” from the drop-down, and click on the “Apply” button.
- WordPress will ask for confirmation, so select “Ok” to deactivate selected plugins.
- Now plugins are deactivated but not deleted yet. So again select all plugins (apart from the Bluehost plugin), open the bulk action menu, and now select “Delete”.
- WordPress will ask for confirmation, so click on “Ok” to delete selected plugins.
That’s all that you need to delete pre-installed plugins.
You can keep the Bluehost plugin because we need it to quickly launch our blog. After launching a blog, we will also delete Bluehost in the upcoming steps.
Good job! Now there is no pre-installed plugin.
Delete Sample Comments
Delete sample comments because there is no valve for sample comments. Here are the steps:
- Navigate to your WordPress dashboard and select “Comments” from the left bar.
- Hover over the sample comment and select “Trash” from the bottom of the comment.
- Now go to the “Trash” tab and again hover over sample comments to select “Delete permanently”.
Well done! Now there is no sample comment.
Delete Pre-installed Themes
We don’t need pre-installed themes because we will install a professional, fully functional, and high-quality theme. Here is how you can delete pre-installed themes:
- Navigate to the WordPress dashboard.
- Go to “Appearance” from the left bar and select “Themes”.
- By default, the Twenty-Twenty theme is activated for your blog and apart from this, 3 more installed themes are there.
- Delete these installed themes one by one. To do so, select an individual theme, and from the bottom select the “Delete” button.
- WordPress will ask for confirmation, so select the “Ok” button to delete.
- In the same way, delete the other two installed themes.
- As of now, don’t delete the twenty-twenty theme and we will delete this theme once we have activated the desired theme.
Congratulations! Now your WordPress dashboard is super clean.
Step 6 – Set up WordPress Settings
WordPress gives you full control of your blog and that’s why it comes with WordPress settings. You can customize these settings as per your needs.
In this step, I will show you how you can change your WordPress settings.
User Profile Settings
You can customize your WordPress profile to your taste. Let’s see how you can customize it:
- Navigate to your WordPress dashboard, hover over your “Profile Icon” from the top, and select “Edit Profile”.

- By default, the visual editor and syntax highlighting are unmarked, so you can keep these settings as it is.
- Next, you can choose a color scheme as per your taste for your WordPress dashboard.
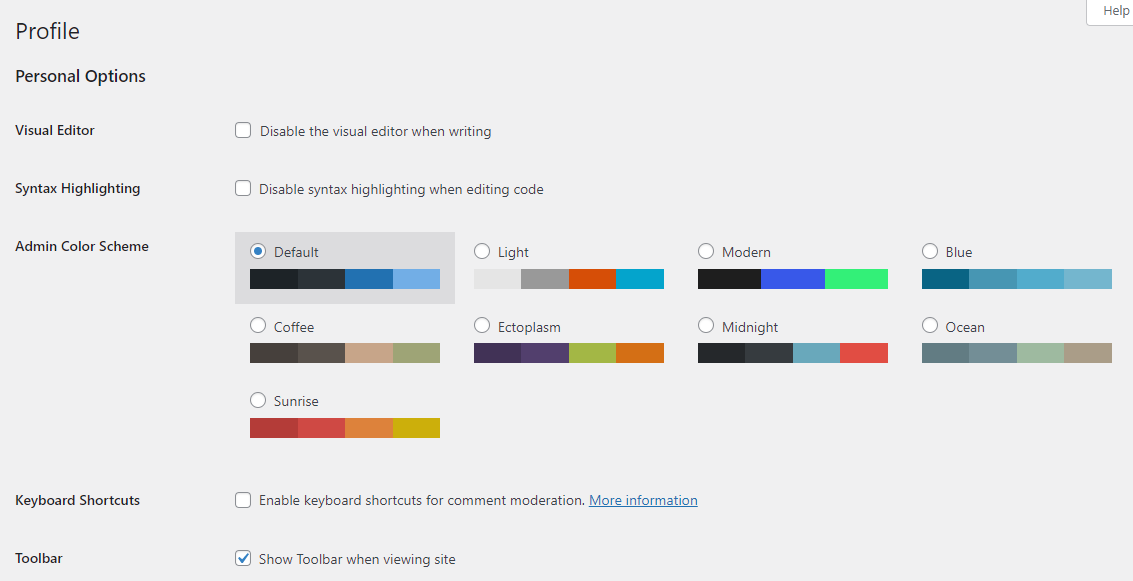
- Keep keyboard shortcuts and toolbar settings as it is.
- You cannot change your WordPress username. But you can enter your preferred first name, last name, nickname, and display name.
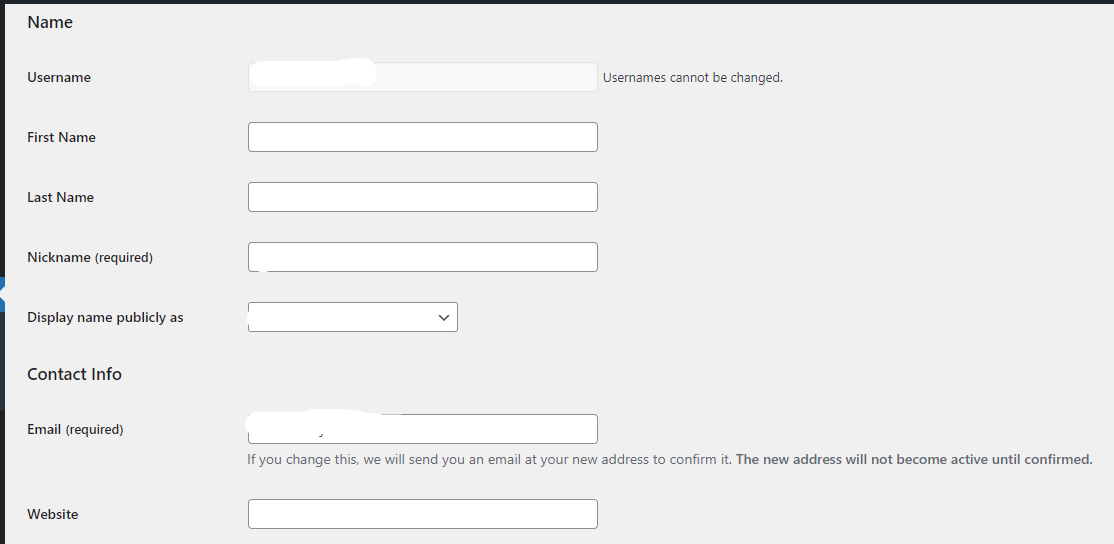
- If you want to change your email id, then you can replace your email id here and then confirm your email to get activated.
- Next is the about yourself section. Here you can add your short bio and profile picture.
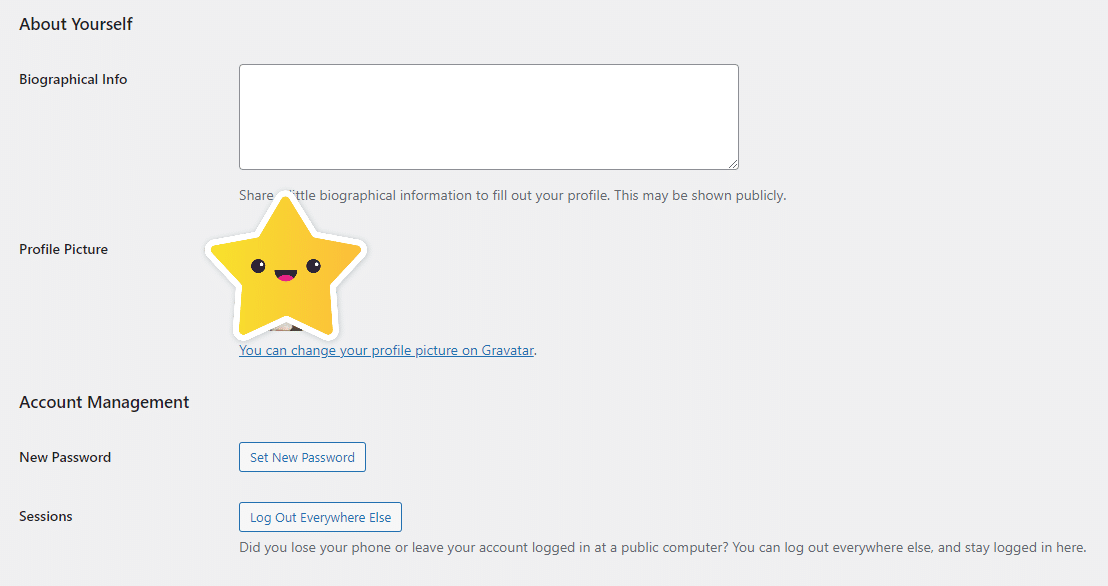
- By default, Bluehost sets the WordPress password, so if you want to change your default password, click on the set new password button. (This is how you can change an existing WordPress password).
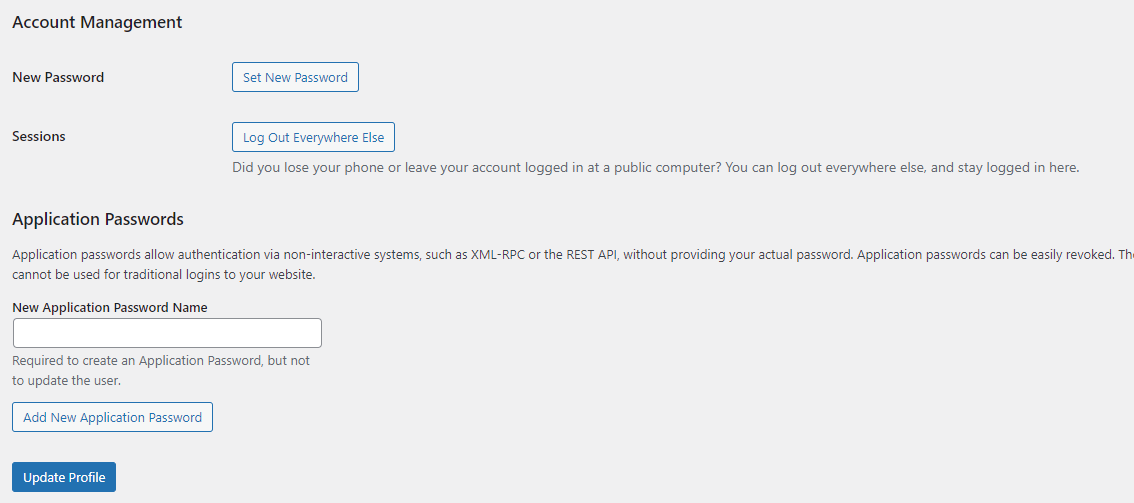
- Keep all other settings as it is and finally click on the update profile button to save your changes.
How To Access Other WordPress Settings?
Here is how you can access it:
- Navigate to your WordPress dashboard.
- Select “Settings” from the left bar.
- From here, you can select general, writing, reading, discussion, media, permalinks, and privacy settings.
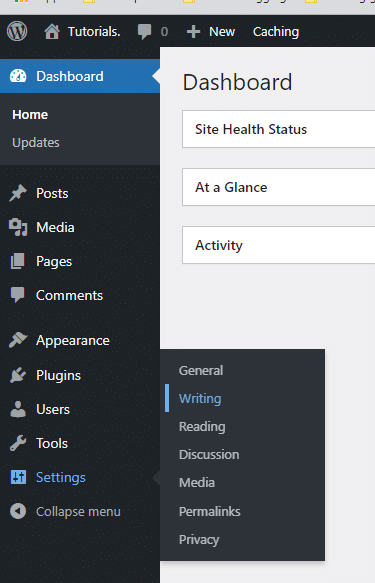
Let’s customize WordPress settings!
General Settings
Navigate to WordPress Dashboard → Settings → General
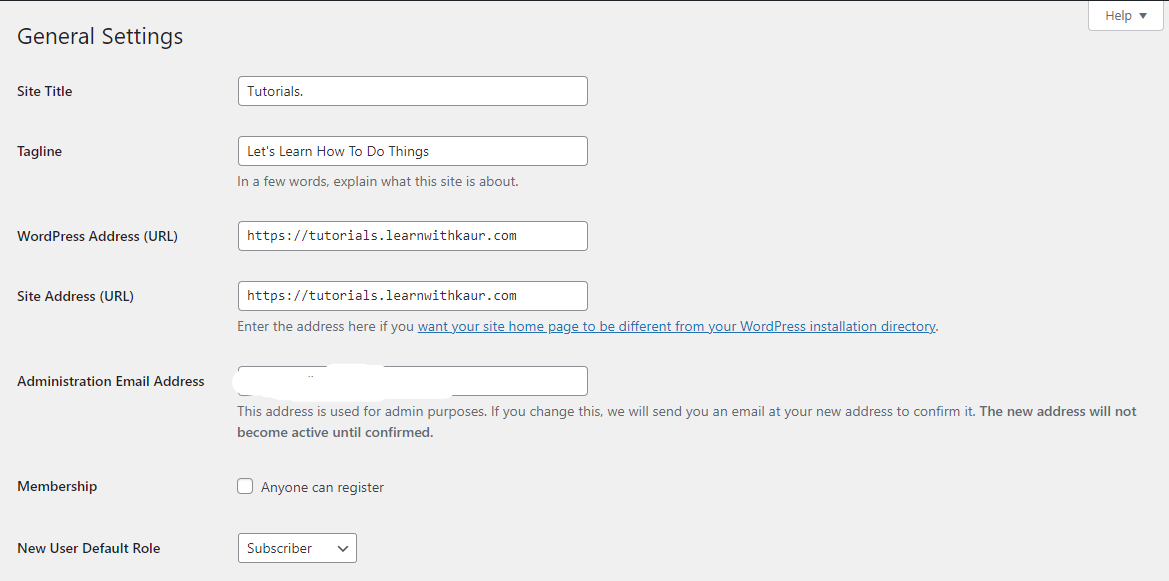
Enter the name of your blog in the site title box and enter brief information about your blog in the site tagline box. (This is how you can add details about your blog as we have discussed earlier).
Choose your time zone, date, and time format.
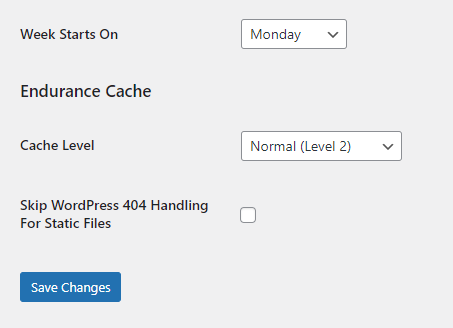
Keep all other settings as it is and finally click on the” Save Changes” button.
Writing Settings
Navigate to WordPress Dashboard → Settings → Writing
From here, you can manage the default post category, default post format, and many other writing settings.
Change the settings as shown in the below screenshot and then click on the “Save Changes” button.


Reading Settings
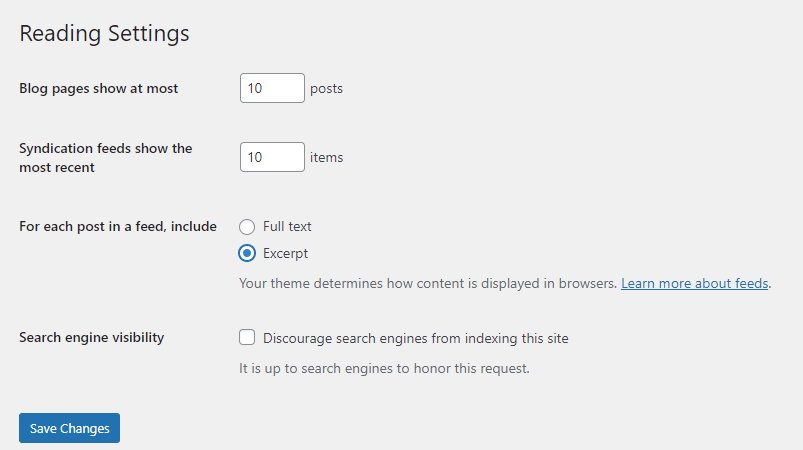
Navigate to WordPress Dashboard → Settings → Reading
From here, you change the number of posts on the blog page and post feed settings.
Follow the below screenshot to change your reading settings. Finally, click on the “Save Changes” button.
Discussion Settings
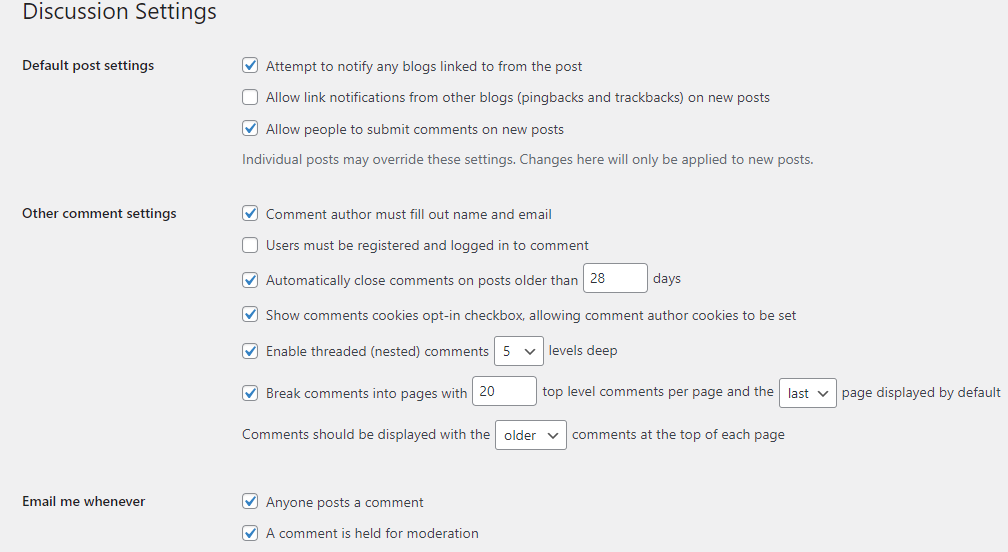
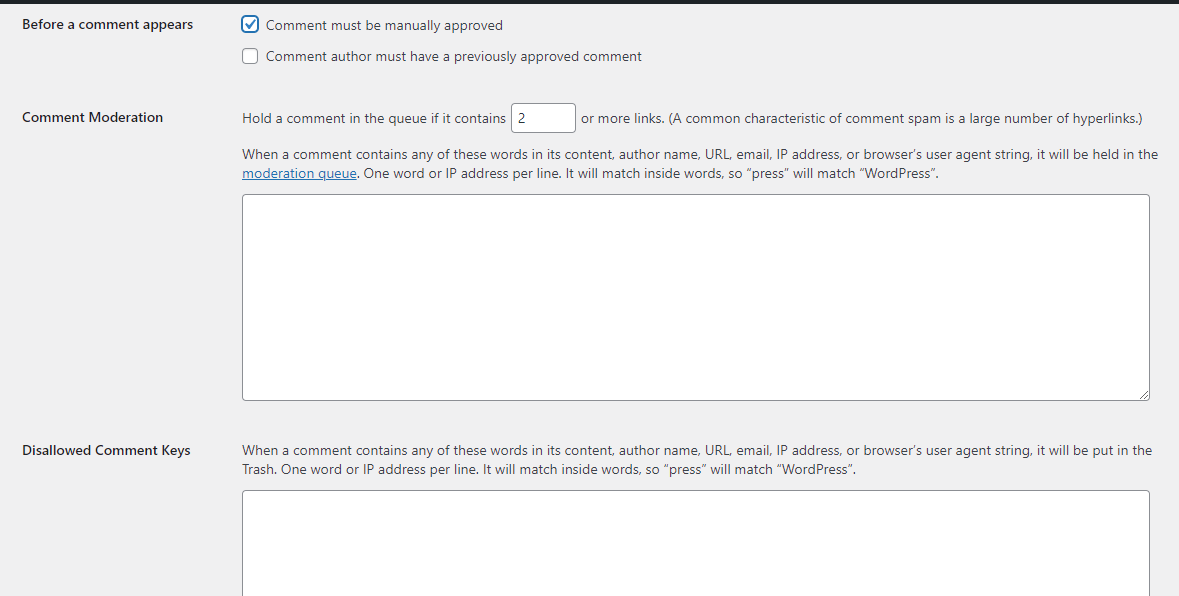
Navigate to WordPress Dashboard → Settings → Discussion
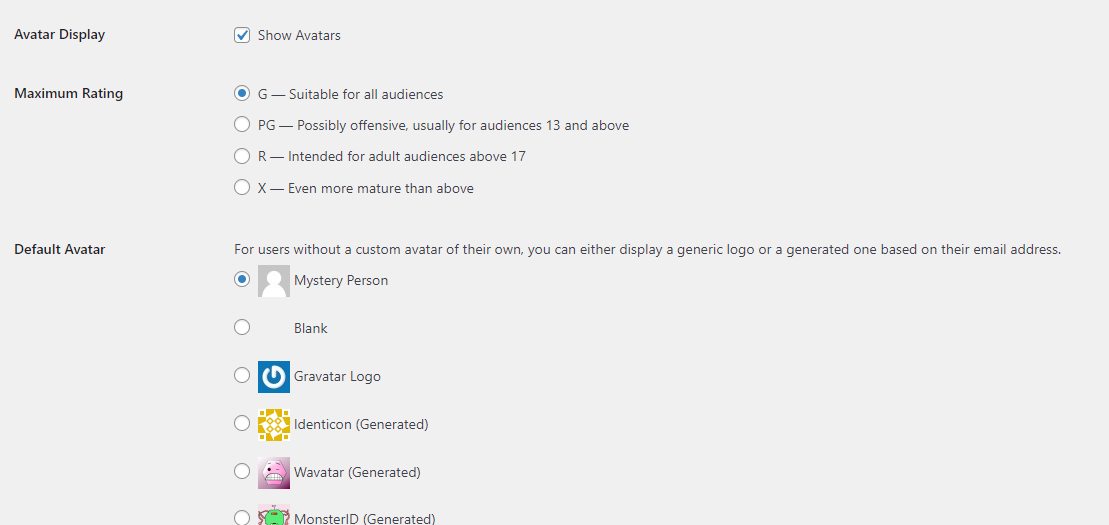
From here, you manage your default post, comment, and avatar settings.
Have a look at the following screenshots to make changes and click on the “Save Changes” button.
Media Settings
Navigate to WordPress Dashboard → Settings → Discussion.
From here, you manage images, thumbnails, and media file settings.
You can check the below screenshot and apply the following media settings in your WordPress dashboard. After making changes, click on the “Save Changes” button.

Permalinks Settings
Navigate to WordPress Dashboard → Settings → Permalinks
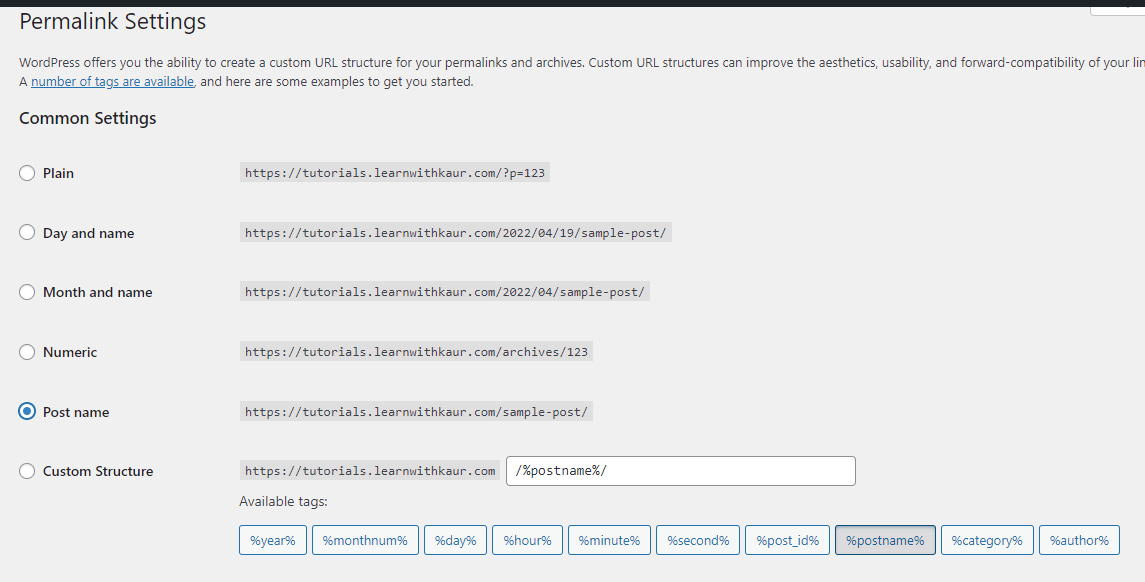
Permalinks settings decide how your website’s URL will look like.
From an SEO perspective, permalink structure plays an important role. You can choose the “Post Name” option because this URL structure is clean and good for SEO practices as well.
Privacy Settings
Using this, you can set up a privacy policy page for your blog. As of now leave privacy settings, once you have learned how to create pages in this guide, then first create a privacy policy page. Then set up your privacy policy page from here.
Perfect! You have done all the WordPress settings, and now you’re ready to design your blog.
Excited? Let’s do that!
Step 7 – Choose, Install, and Customize Your WordPress Theme
A theme decides the layout, appearance, design, and functionalities of your blog.
7.1 Choose Your Theme
There are several free and paid WordPress themes available from which you can choose one that best fits your needs, requirements, and budget.
Tips to Choose a Perfect Theme For Your Blog
While choosing a theme, keep a few most important things in mind:
- The theme should be fully responsive and mobile-friendly so that users from small screens can easily navigate to your blog.
- Pick a lightweight theme so that your blog will load quickly.
- The theme should be SEO-friendly to make your blog SEO-optimized.
- The theme should have all the basic and advanced features that you want in your blog.
- Make sure your theme is fully customizable so that you can make changes as per your needs.
Out of all available WordPress themes, GeneratePress, Astra, and Divi are the most popular themes in the blogging world.
GeneratePress and Astra theme both have free versions which you can use for free. Free versions come with many features, but for advanced features, you can buy GeneratePress or Astra Premium Theme.
Divi has no free version as it is only a premium theme. If you want to use the Divi theme, then you have to pay for it.
Why Should You Choose Free Themes?
If you’re just starting your blogging career and don’t want to spend money on purchasing premium themes, then a free version is a perfect fit for your needs.
Why Should You Choose a Premium Theme?
If you have a budget to pay for a premium theme, then buy a perfect premium theme. Here is how premium themes are beneficial:
- Premium themes come with full customization controls. For example, you can change the copyright message with a premium theme, not with free themes.
- When you buy a premium theme, you will get access to pre-designed professional templates. So, it means you can skip the designing of your blog and all you need to do is pick a perfect template from the library of your premium theme and install it. Further, you can make changes if you want and there is no need to create the design of your blog from scratch. Pre-designed templates can really save you lots of hours and effort which you have to spend on designing your blog.
- Apart from this, there are many more benefits, such as with premium themes you will get access to customer support and other blog-building materials.
Top 3 Premium Themes: Generatrepress, Astra, and Divi
I use the GeneratePress premium theme because it is the most lightweight theme and comes with many useful features.
Using GeneratePress, you can design any type of blog as it comes with hundreds of customization controls, professionally designed templates, and blocks to build your blog. If you care about the speed of your blog, then you should use the GeneratePress theme for your blog.
7.2 Install Your Theme
After deciding on a theme for your blog, the next step is to install your theme.
How To Install a WordPress Theme?
Here is how you can do that:
Navigate to your WordPress dashboard, go to “Appearance” and select “Themes”.
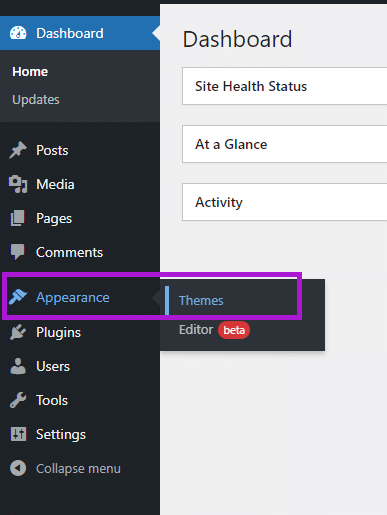
Click on the “Add New” button from the top of the page.
Steps for Installing a Theme From the WordPress Repository
Within the WordPress dashboard, you will see several free WordPress themes. So. if you want to install any free theme, then follow the below steps:
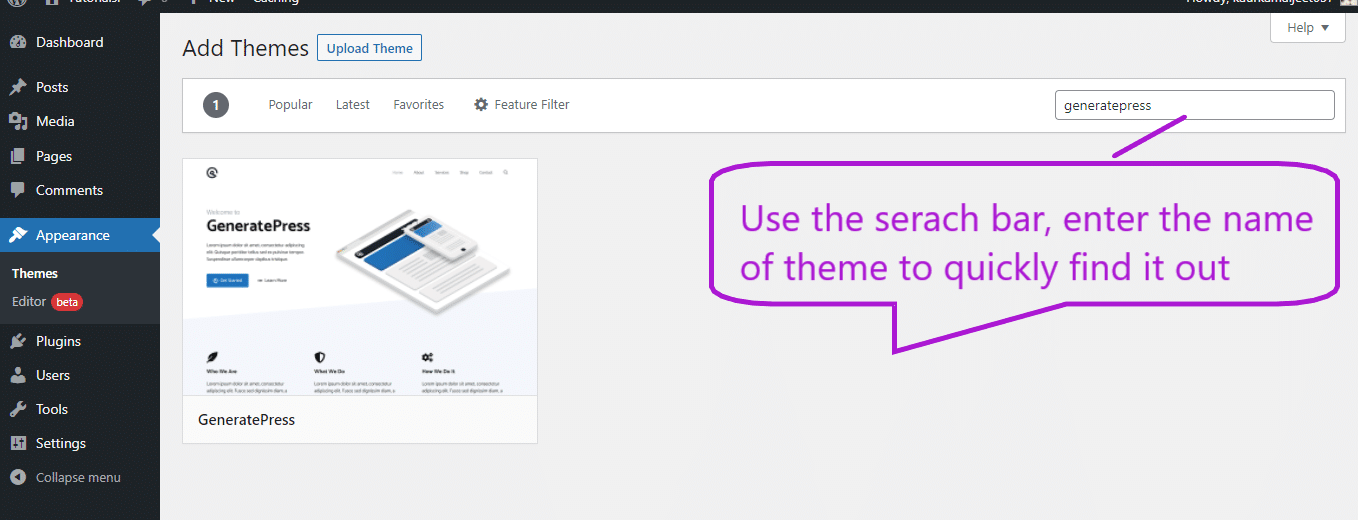
- Use a search bar to locate your preferred free theme.
- Next, select your theme and click on the “Install” button.
- After installing the theme, click on the “Activate” theme.
Perfect! Now your theme is activated for your blog.
Steps for Uploading and Installing Themes
If you want to upload any external theme, then follow the below steps:
- Download the zip file of your theme. For this, visit the official website of your theme and download it.
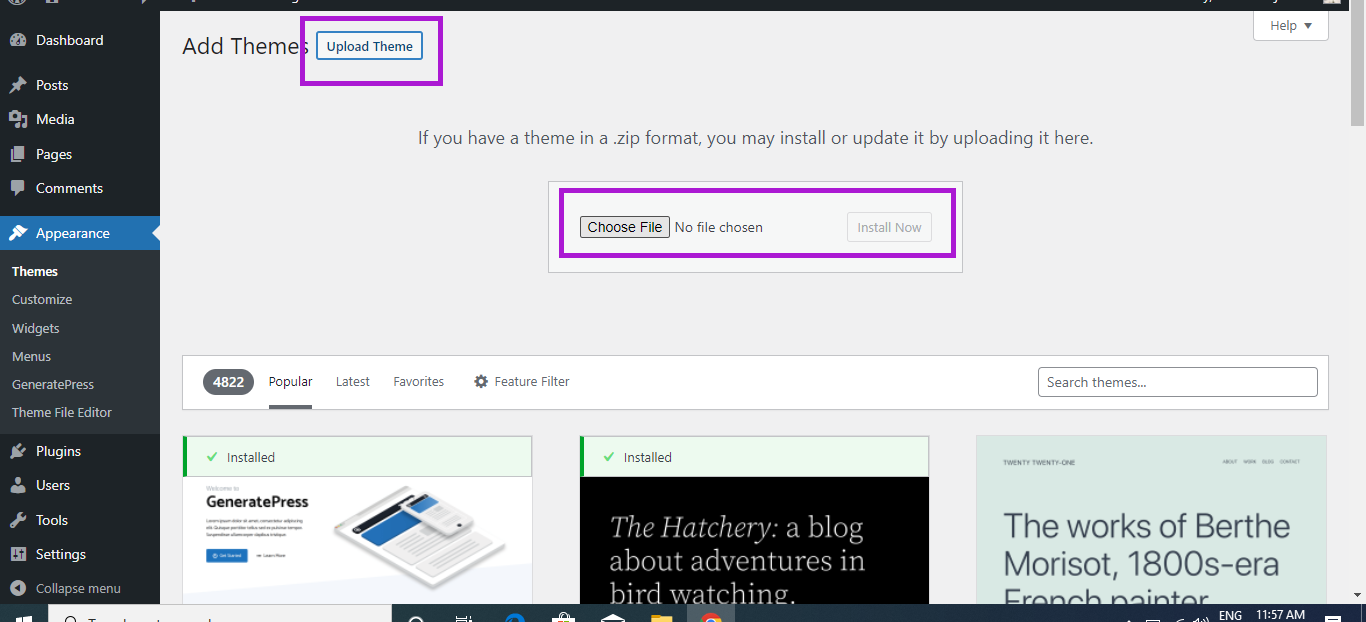
- Navigate to the “Appearance, select “Themes” and click on the “Upload Theme” button.
- Now click on the Choose file button, select your file, and click on “Install Now”.
- After installing, click on “Activate”.
After installing and activating your preferred plugin, delete the Twenty-Twenty theme, which is by default installed.
Because at one time your blog should have only one theme, and unnecessary themes can hurt the performance of your blog. So follow the steps that we discussed above to delete the Twenty-Twenty theme.
Congratulations! Now your blog has your preferred theme and you have a basic skin and layout of your blog.
7.3 Customize Your Theme
When you install your theme, it comes with default settings, but what if you want to change that theme setting to your taste?
Well! WordPress comes with a customizer and by using it you can change your theme’s settings in no time. Perfect! Let’s have a look at how you can access the WordPress customizer:
- Navigate to your WordPress dashboard.
- Go to “Appearance” and select “Customize”.
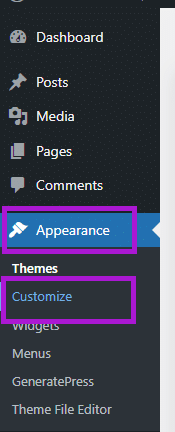
It will land you on WordPress Customizer and from here, you can customize your theme’s settings to your taste. Here is a quick snapshot of customization settings:
Site Identity: Add site title, tagline, logo, and site icon for your blog.
Layout: Choose a preferred layout for different parts of your blog such as containers, headers, primary navigation, sidebars, footer, and blog layout.
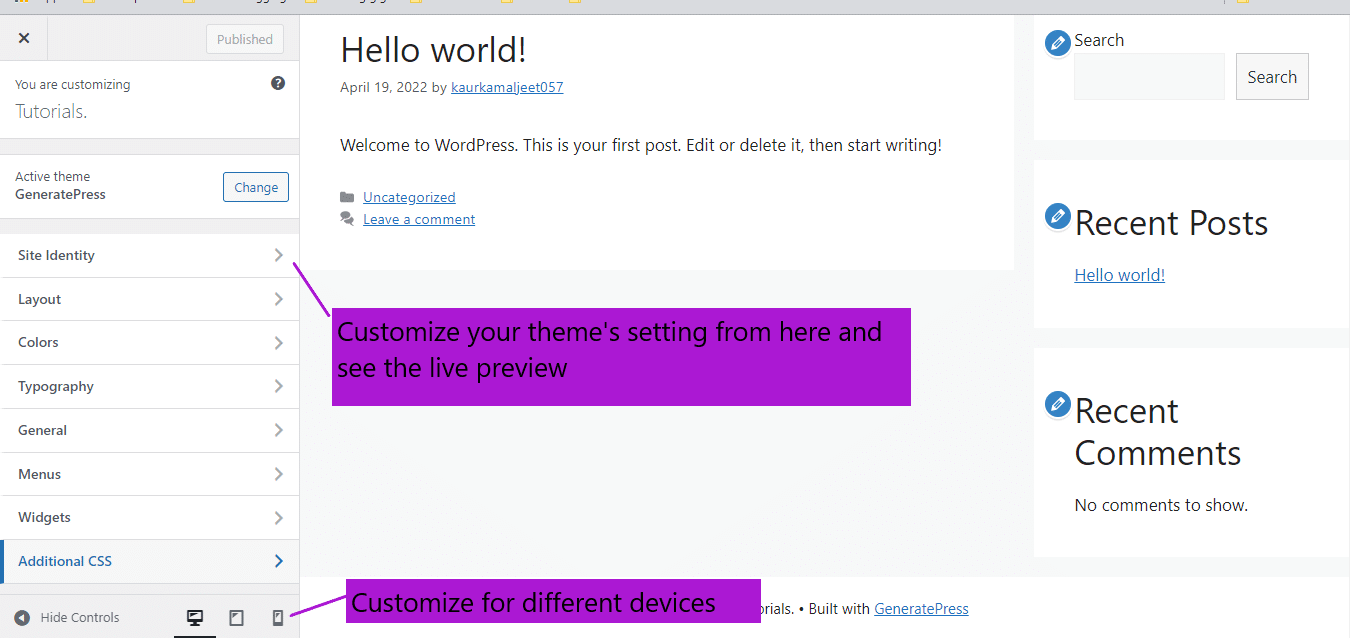
Color: Choose the brand colors that you want to use on your blog. Further, you can select colors for the different parts of your blog such as the body, headers, primary navigation, buttons, content, links, forms, sidebar widgets, and footer area.
Typography: Choose font language, size, and weight for your blog’s content.
General: Choose general settings for your blog like icon type, underlined links, and smooth scroll.
Menus: Create, manage, and organize your blog’s menus.
Widgets: Create, manage, and organize different widgets such as top, right-side bar, header bar, footer bar, and footer widgets.
Additional CSS: In case you want to include external CSS for designing your blog, then you can paste that CSS in this area.
Make Your Blog Responsive: At the bottom of your WordPress customizer, you’ll see three icons, desktop, tablet, and mobile. You can click on these icons to see how your website will look on different devices.
If you want to change your mobile or tablet screen settings, then hit the respective icon and then change those device settings. This is how you can make sure that your blog will look perfect on all devices (desktop, tablet, and phone).
These are the basic customization settings that almost every theme offers you, but these settings may vary from theme to theme.
If you have a premium theme, then you’ll see many more advanced customization settings, for example, copyright, disable elements, site library(pre-made templates), and many more.
You can visit the customizer area and play with customization options to make your blog look as per your expectations.
Once you’re happy with the settings, then hit the “Publish” button from the top of your customizer. Otherwise, your changes will not come into effect.
Step 8 – Design Your Blog
After installing, activating, and customizing your theme, you will have a basic skin of your blog and settings as per your needs. If you want to create a beautiful and professional-looking blog, then go one step ahead and design your blog.
There are two ways to design your blog as follows:
Use Pre-made Templates (Quick way)
As we have discussed above, the premium themes come with pre-made templates. You can insert these templates into your blog, to quickly change the design of your blog.
For this, your blog should have a theme and, after activating a theme, you can insert a template to quickly change the design of your blog.
Design Your Blog Manually (Needs quality time, and effort)
You can also create the design of your blog from scratch. For this, you can use drag-and-drop page builders or an existing WordPress block editor.
This is a great way to get the desired design of your blog, but for this, you must have quality time to put effort into learning how to design a blog.
Step 9 – Install the Necessary Plugins
WordPress plugins are simply small software applications that can enhance the functionalities of your blog with a few mouse clicks.
Almost for every feature, there is a plugin that you can use on your blog. So, without writing a single line of code, you can include enhanced features in your blog. There are two types of plugins:
- Free plugins: Free-to-use
- Premium Plugins: You have to pay for these plugins as per their pricing.
There are countless plugins for various features, but here is the list of must-have plugins that you should install on your blog.
Before that let’s learn how you can install any plugin on your WordPress Blog.
How To Install Any Plugin?
- Go to your WordPress Dashboard,
- Navigate to “Plugins” and click on “Add new”.
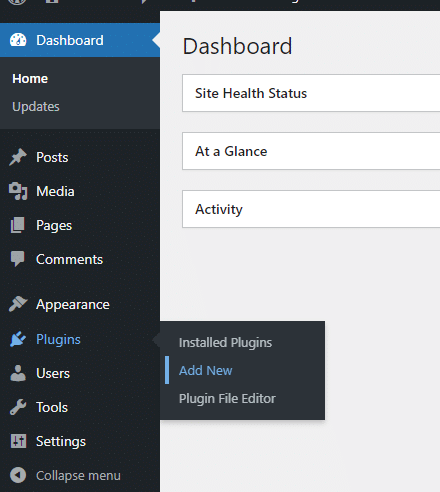
- You can use the upload button to upload zip files(if you have purchased premium plugins).

- Otherwise, use the search bar to find free plugins.

- Click on “Install Now” and then hit the “Activate” button.

Security Plugin: To secure your blog from online attacks, vulnerabilities, and hackers.
- Recommend Security Plugin: Ithemes Security (Free version is enough)
SEO Plugin: To optimize your blog for SEO and offer you many SEO tools for driving organic traffic.
- Recommended SEO plugin: RankMath (Use Free or Paid version)
Contact Form Plugin: This helps you to add contact forms, newsletters, and other sign-up forms to your blog so that your audience can easily get in touch with you.
- Recommended Contact Form plugin: WpForms (Free version is enough)
Backup/Restore Plugin: Allows manual or automatic backups to your local or online servers. In case your website faces any issues or crashes, you can restore the backup to get your blog back.
- Recommended Backup/Restore Plugin: Updraft plus (Free version is enough)
Performance Plugin: Optimize your website’s speed and offer you tools for caching, HTML, CSS, JavaScript minification, database & media optimization, and many more performance optimization tools.
- Recommended Plugin: WpRocket (Only paid version is available)
- Free Plugins: Autoptimize, W3 Total Cache, Wp super cache
Image Optimization Plugin: Un-optimized media files can affect the performance of your blog, so use an image optimization plugin for optimizing your images.
Top Recommendation: Imagify (with a free plan, you can optimize approximately 200 images per month).
Alternative options: Tiny PNG
Block-based Plugin: Gives you many pre-made blocks that you can use for designing and creating content for your blog.
Recommend Block-Based plugin: Ultimate Addon for Gutenberg
Which Plugins You Should Choose Free or Premium?
No doubt, Premium themes give you full access to features, but if you are just starting your blogging career then you can install free plugins. The free version of the above-mentioned blog is enough for a beginner.
But, if you have a budget and want to take your blog to the next level then buy premium plugins.
Step 10 – Organize Your WordPress Blog
The organization of your blog is very important. Both users and search engines love a properly organized blog because it improves users’ experience. To organize your blog properly, you can use menus, widgets, categories, and tags.
Menus
Include top and bottom navigation menus so that your potential reader can easily find the most useful links and content without spending much time. Following are the steps to add menus to your blog:
Appearance –> Menus –> Create a new menu or edit existing menus –> Save menu
Widgets
Using widgets, you can properly use the right, left, bottom, and top spaces of your blog to display different content pieces. It can be a call to action, contact form, list of categories, recent posts, or newsletter sign-up form.
Appearance –> Widgets –> Create a new widget or edit existing widgets –> Update
Categories
Use categories to categorize your content effectively. Let’s suppose you’re writing content on cooking, then you can create the following categories so that your readers can easily find content on your blog.
- Vegetable recipes
- Shake Recipes
- Cake recipes
- Juice recipes
- Soup recipes.
You can display categories in menus or widgets. Whenever any visitor clicks on any category, the posts that are published under that selected category will be shown to them. So this is how categories can help your readers quickly find content on your blog.
Posts –> Categories –> Add a new category or edit existing categories.
Tags
Using tags, you can group similar posts. This is quite relevant to categories. You can display tags on your blog and whenever the user clicks on any tag, they will be redirected to an archive page that contains the posts that are tagged under that tag. From there, readers can choose which post they want to read.
Posts — > Tags –> Add new tags or edit existing tags.
Step 11 – Create Pre-launch Pages
Pages are basically used to publish static content on your blog which is not frequently updated such as the home page, about us, contact us, privacy policy, disclaimer, and services pages.
All these pages are examples of pre-launch pages, so before launching your blog make sure to create pages for your blog. So that whenever anyone visits your blog they will come to know who you are, what you’re offering, and how your blog can help them.
Apart from your visitors, pre-launch pages also help search engines to better understand your blog.
Based on your niche you can create specific pages for your blog. For example, for an affiliate blog, you should create an affiliate disclosure page and this page is not required for other blogs.
Here are the most important pages that you can create for your blog:
- Home page
- About us
- Contact us
- Privacy policy
- Disclaimer
Steps to Create Pages for Your Blog
- Navigate to your WordPress dashboard.
- Hover over “Pages and then select “Add new”.

- It will redirect you to the WordPress block editor where you can create your page.

- On the left side, you can add the title and the whole content of your page.
- On the right side, you can change all the page settings like status, visibility, permalink, featured image, and other settings.
- After creating a page, hit the publish button to make it visible on your blog.
- In case you want to publish your page later, then click on save a draft and it will save changes in the draft.
These are the simple steps that you can follow to create different pages for your blog.
Step 12 – Create Your First Blog Post
Pages are used to put static content on your blog and posts are used to put regular content on your blog.
The blog post is specially used to drive revenue from your blog, so this is a place where you can share how-to guides, ultimate guides, tips, and other content as per your niche to educate, inform, and drive conversational action from your readers.
How To Create a Blog Post?
Here are the steps that you can follow to create your blog post:
- Navigate to your WordPress dashboard.
- Select “Posts” from the left bar and click on “Add new”.
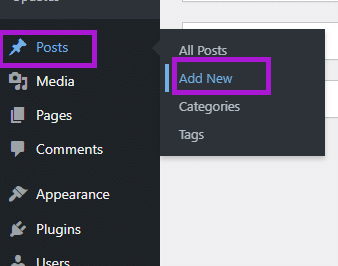
- It will open a block editor for you where you can write your blog post.
- Enter the title and blog content and choose the preferred settings for your blog post.
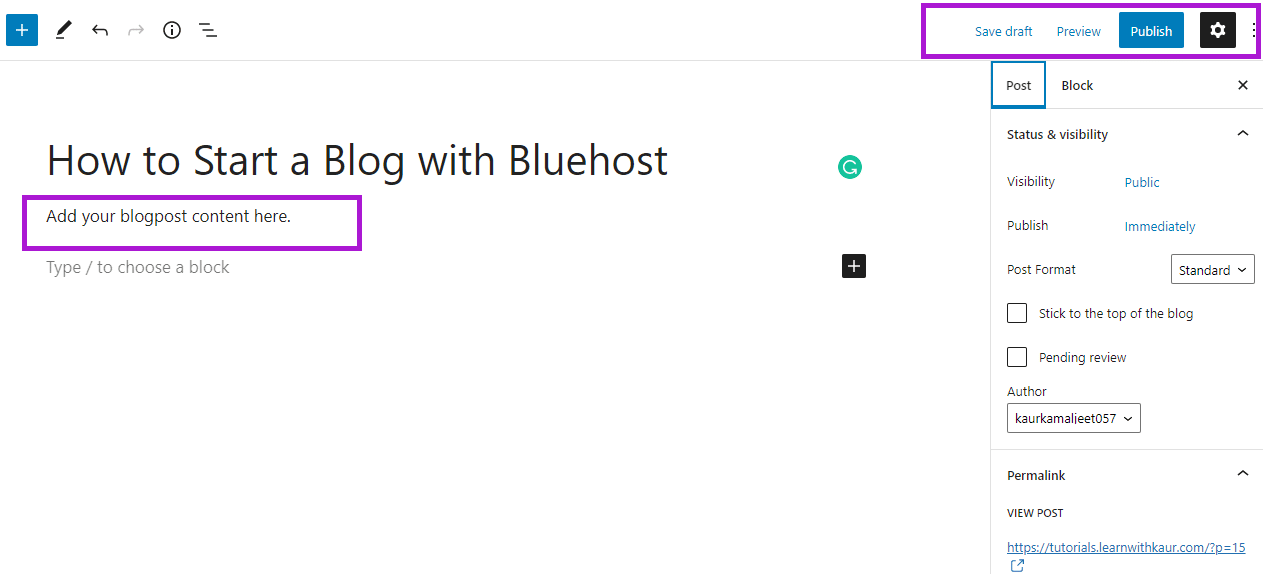
- Once you’re done, hit the “Publish” button to make your content live on your website. If you want to publish it later, then hit the “Save Draft” button and it will save your blog post as a draft.
Every time when you want to create and add a new blog post to your blog, you can follow the same steps.
Tips to Create High-Quality Blog Posts
On the internet, there are tons of blog posts available on each topic. Then how will you beat the competition?
We all know that content is king in the blogging world. You have to create high-quality content for your readers to beat the competition. Here are some tips to create high-quality blog content:
- Do keyword research to find profitable keywords for your blog posts.
- Create unique, valuable, and engaging content around your selected keywords to beat the competition.
- Write engaging headlines or titles for your blog to capture the attention of your potential readers.
- Use simple and clear language so that your audience can easily understand your content.
- Make sure your content is grammatically correct and there are no spelling errors. You can use grammar-checking tools like Grammarly.
- Always create unique content and never copy it from your competitor’s websites. Copied content is called plagiarized in a professional language and it is not valuable for users & search engines also do not give priority to this type of content.
- Focus on the pain points of your audience and give them the best possible solution with your content.
- Add images and other media content to make your content visually appealing.
- Include useful links in your blog.
- Optimize your content for SEO to drive organic traffic.
Step 13 – Launch Your Blog
You have learned how to set up, design, and create content for your blog. After performing the above steps, you’re ready to launch your blog to make it visible to the world.
Visit your WordPress dashboard and you’ll see a notification that your website is showing coming soon. It means your website has not launched on the internet yet. (You’ll only see this notification if you have not deleted the Bluehost plugin yet).
Steps to Launch Your Blog
- At the top of your WordPress dashboard, you will see the coming soon page activated. Click on it.

- It will bring you to the Bluehost dashboard, and navigate to the” Settings” tab.
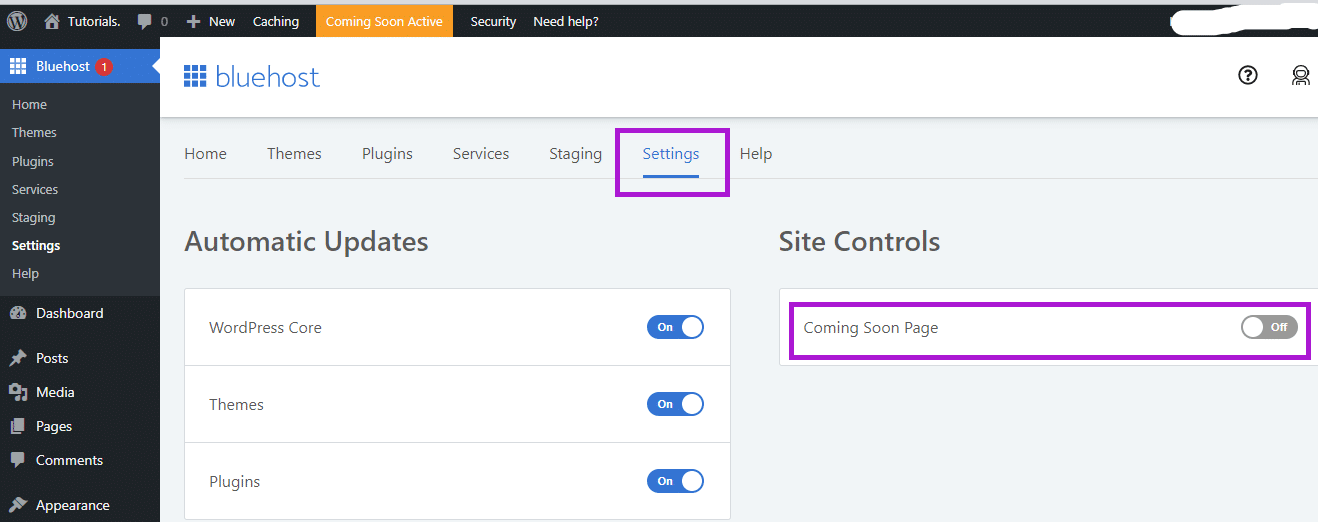
- Turn off the coming soon page.
This is how you can launch your blog from the WordPress dashboard.
After launching your blog, delete the Bluehost plugin because we don’t need this anymore on WordPress. You can access these settings by logging into your Bluehost account.
Here is how you can delete the Bluehost plugin:
Navigate to plugins → installed plugins→ Deactivate Bluehost plugin -> Delete Bluehost plugin.
Congratulations! Now your blog is live and anyone can access it with your blog’s URL.
Step 14 – Submit Your Blog to Search Engines and Other Tools
After launching your blog, your next and most important step is to submit your blog to search engines. And set up tools for your blog that can help you to grow and measure your blogging efforts.
The best thing about these tools is that these tools are free to use and come with the most valuable features.
Have you ever thought about how your blog will appear on search engine result pages?
So for this, you have to submit your blog to search engines, so that they come to know that your blog is live for crawling and indexing.
Now, how can you do that?
Perfect! For this, set up a Google search console and Bing webmasters tool for your blog and submit a sitemap in these tools.
Submit Your Blog to Google Search Console
Google Search Console is a tool that helps you to rank your blog in Google search results. Using it, you can measure the search traffic and how your content is performing in Google searches.
After setting up the Google Search Console for your blog, Google will come to know that your blog is live on the internet and Google bots will start crawling and indexing your blog content.
After indexing, Google will rank your content based on search engine requirements. If your content is SEO-optimized and unique then it can be shown to your audience whenever they search for relevant queries. This is how you can drive free organic traffic for your blog.
Submit Blog in Bing Webmasters
As the Google search console is a tool for the Google search engine, in the same way, Bing webmaster is a tool for the bing search engine. It helps you to index, rank, and discover your blog content in Bing search results.
So, make sure to set up a Bing webmaster tool for your blog.
Setup Google Analytics For Your Blog
Google Analytics is a website performance measurement tool that helps you to measure the success of your blog. With Google Analytics you can easily measure the following:
- From where you’re getting traffic like traffic sources, devices, locations, and many more things.
- Your top-performing content with many metrics like traffic amount, source, and session duration.
- Real-time report of your website’s performance and users.
- Analyze and explore your blog’s visitors like their demographics, interests, behavior, and devices they are using to access your blog.
- Measure the goals, conversions, and marketing campaign results.
Many more things that you can measure with Google Analytics. So this is the most useful tool for measuring the performance and success of your blog.
Sign up with Google Analytics to start tracking your blog’s performance.
Step 15 – Next Steps To Grow Your Blog
Starting a blog is an initial step in the blogging world. To generate an income from your blog, follow the steps to grow your blog.
Blogging is an online business, and it needs continuous effort because making money from blogging is possible only if you’re willing to put effort into growing your blog.
So what should you do next to grow your blog?
Start learning skills that can help you to take your blogging business to the next level. Here are some skills which you can learn to grow your blog:
- Content Writing: To create high-quality content for your blog.
- Keyword Research: To find profitable keywords in your niche.
- SEO: To drive free organic traffic for your blog.
- Digital Marketing: To use digital channels to promote your blog.
- Email Marketing: To use email to build your audience.
- Social Media Marketing: To use social media platforms for growing your blog.
- Monetization Methods: Learn real monetization methods to generate income from your blog.
- Blogging Tools: Learn different blogging tools to build, grow, and manage your blog easily and effectively.
Final Thoughts on How To Start A Blog With Bluehost
I hope now you have a clear idea of how to start a blog with Bluehost. Here is a quick recap of how to start a blog with Bluehost:
After building your blog, put consistent efforts into growing your blog to make money out of it.
At the bottom of this blog post, I have covered frequently asked questions and read those questions. In case you have any other questions in mind related to how to start a blog with Bluehost, then ask in the comments.
Happy Blogging!
