
Are you struggling to know how to add menu in WordPress? If so, then look no further, because that’s what you will learn in this guide.
WordPress navigation menu is a list of links which helps readers and search engines to easily find content on your website or blog. There are several benefits of adding a menu to a WordPress website or blog, such as:
- Improves user experience.
- Improve your website organization.
- Helps search engines for easy crawling.
That’s why almost every website or blog has menus.
Excited to know how to add menu in WordPress? Perfect! Let’s do that.
How To Add Menu in WordPress?
WordPress comes with an easy-to-use menu editor, and using it, you can quickly add a menu in WordPress with a few mouse clicks.
Guess what? You do not need to struggle with coding or any technical thing. All you need to do is use your mouse, and follow the below simple steps to add a menu to the WordPress blog or website.
1) Create A New Menu in WordPress
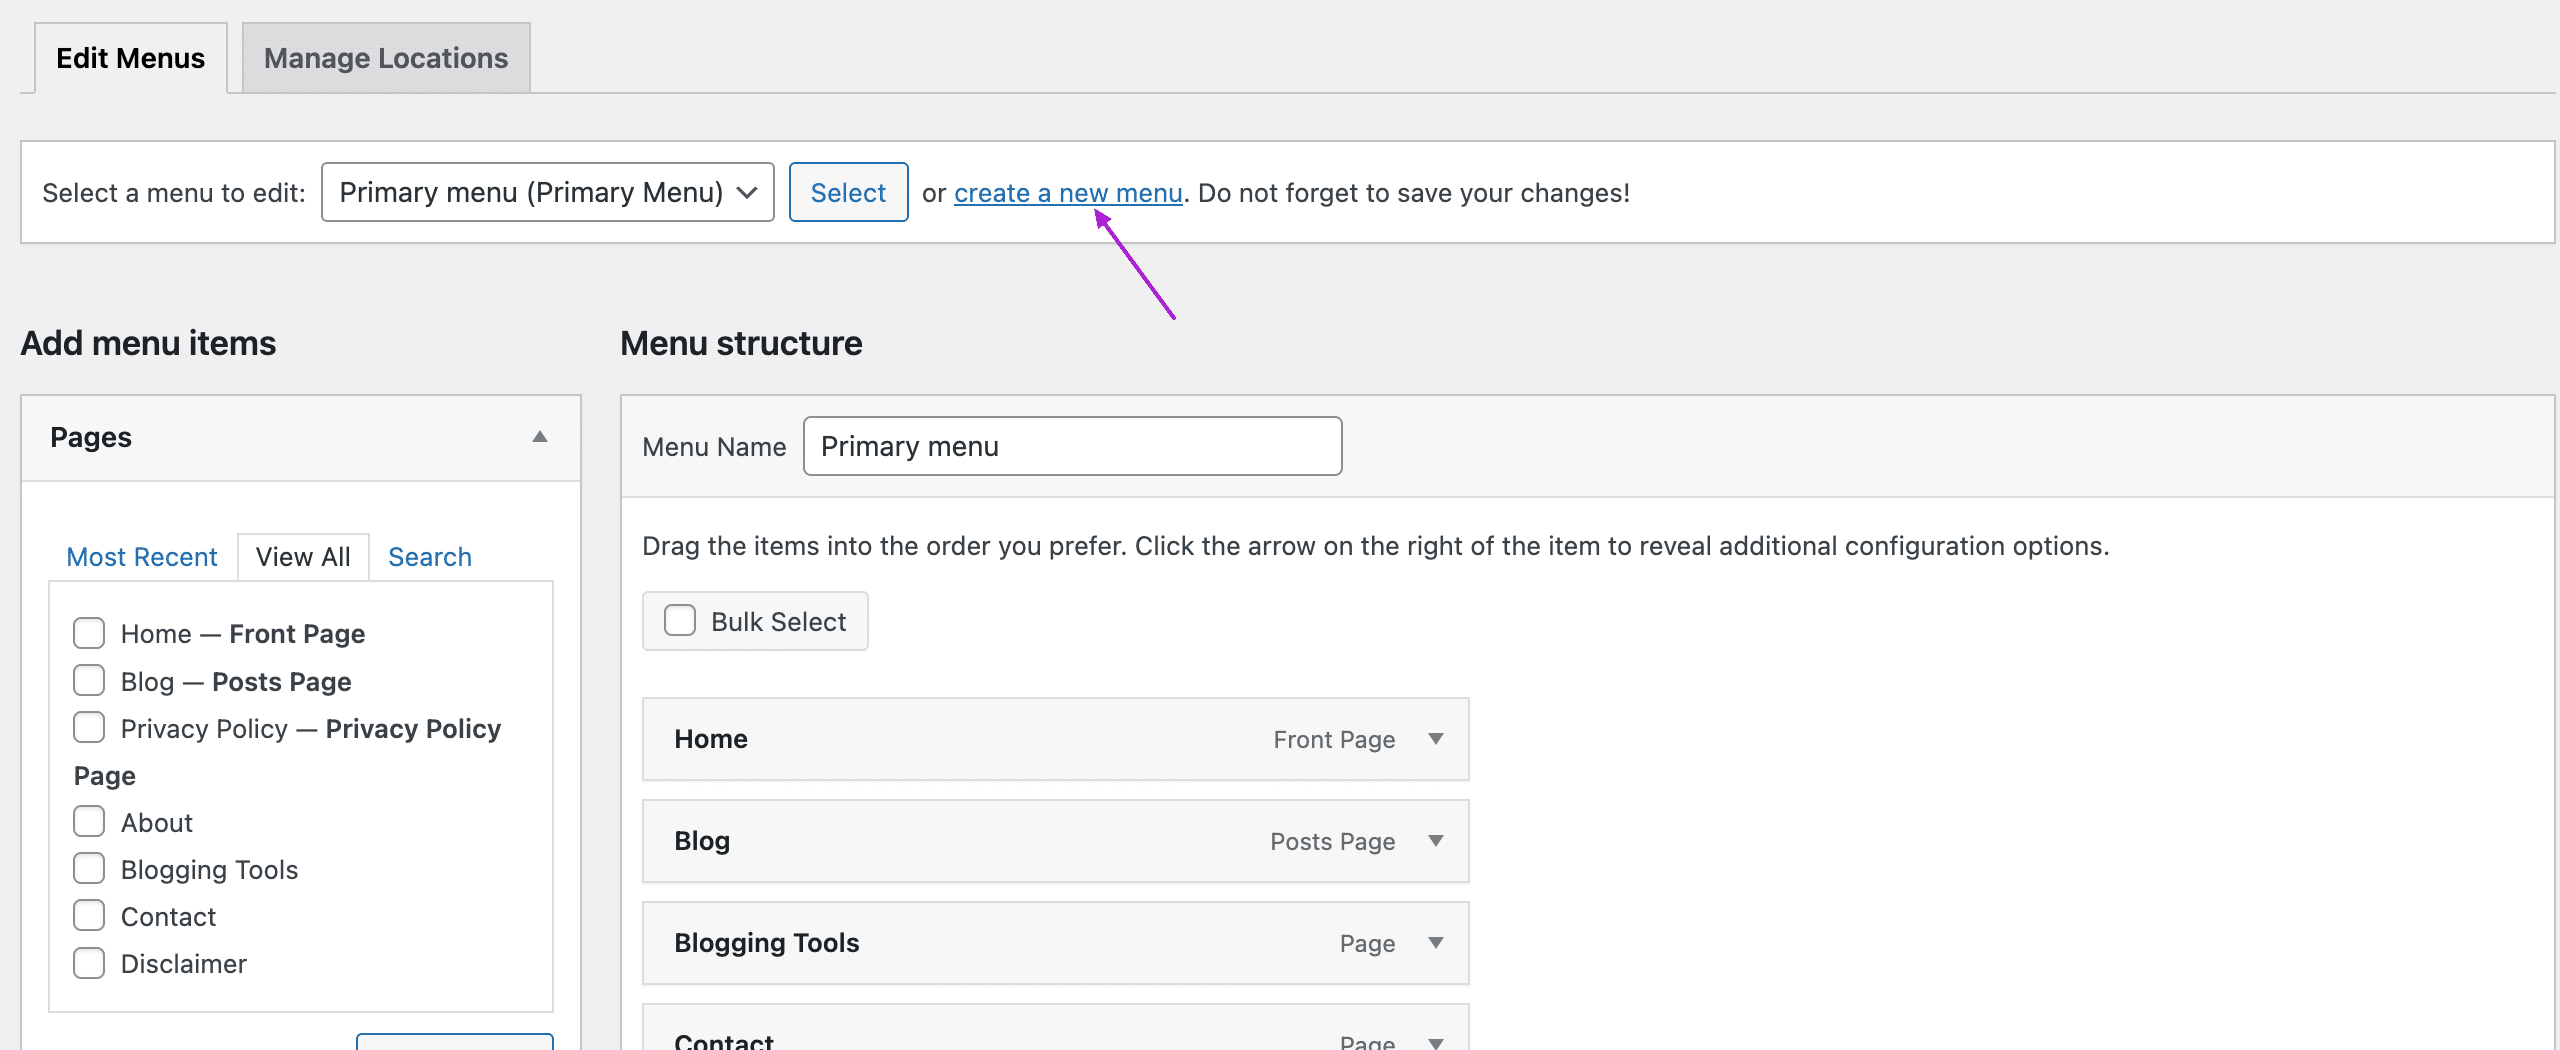
Your first step is to create a new menu in WordPress. Here is how you can do that:
- Navigate to your WordPress dashboard.
- Go to Appearance → Menus.

It will open the menu editor for you. Here you can select the menu if you already created one. Otherwise, click on “Create a New Menu” to create your menu first.
Firstly, enter the name of your menu in the Menu Name box.
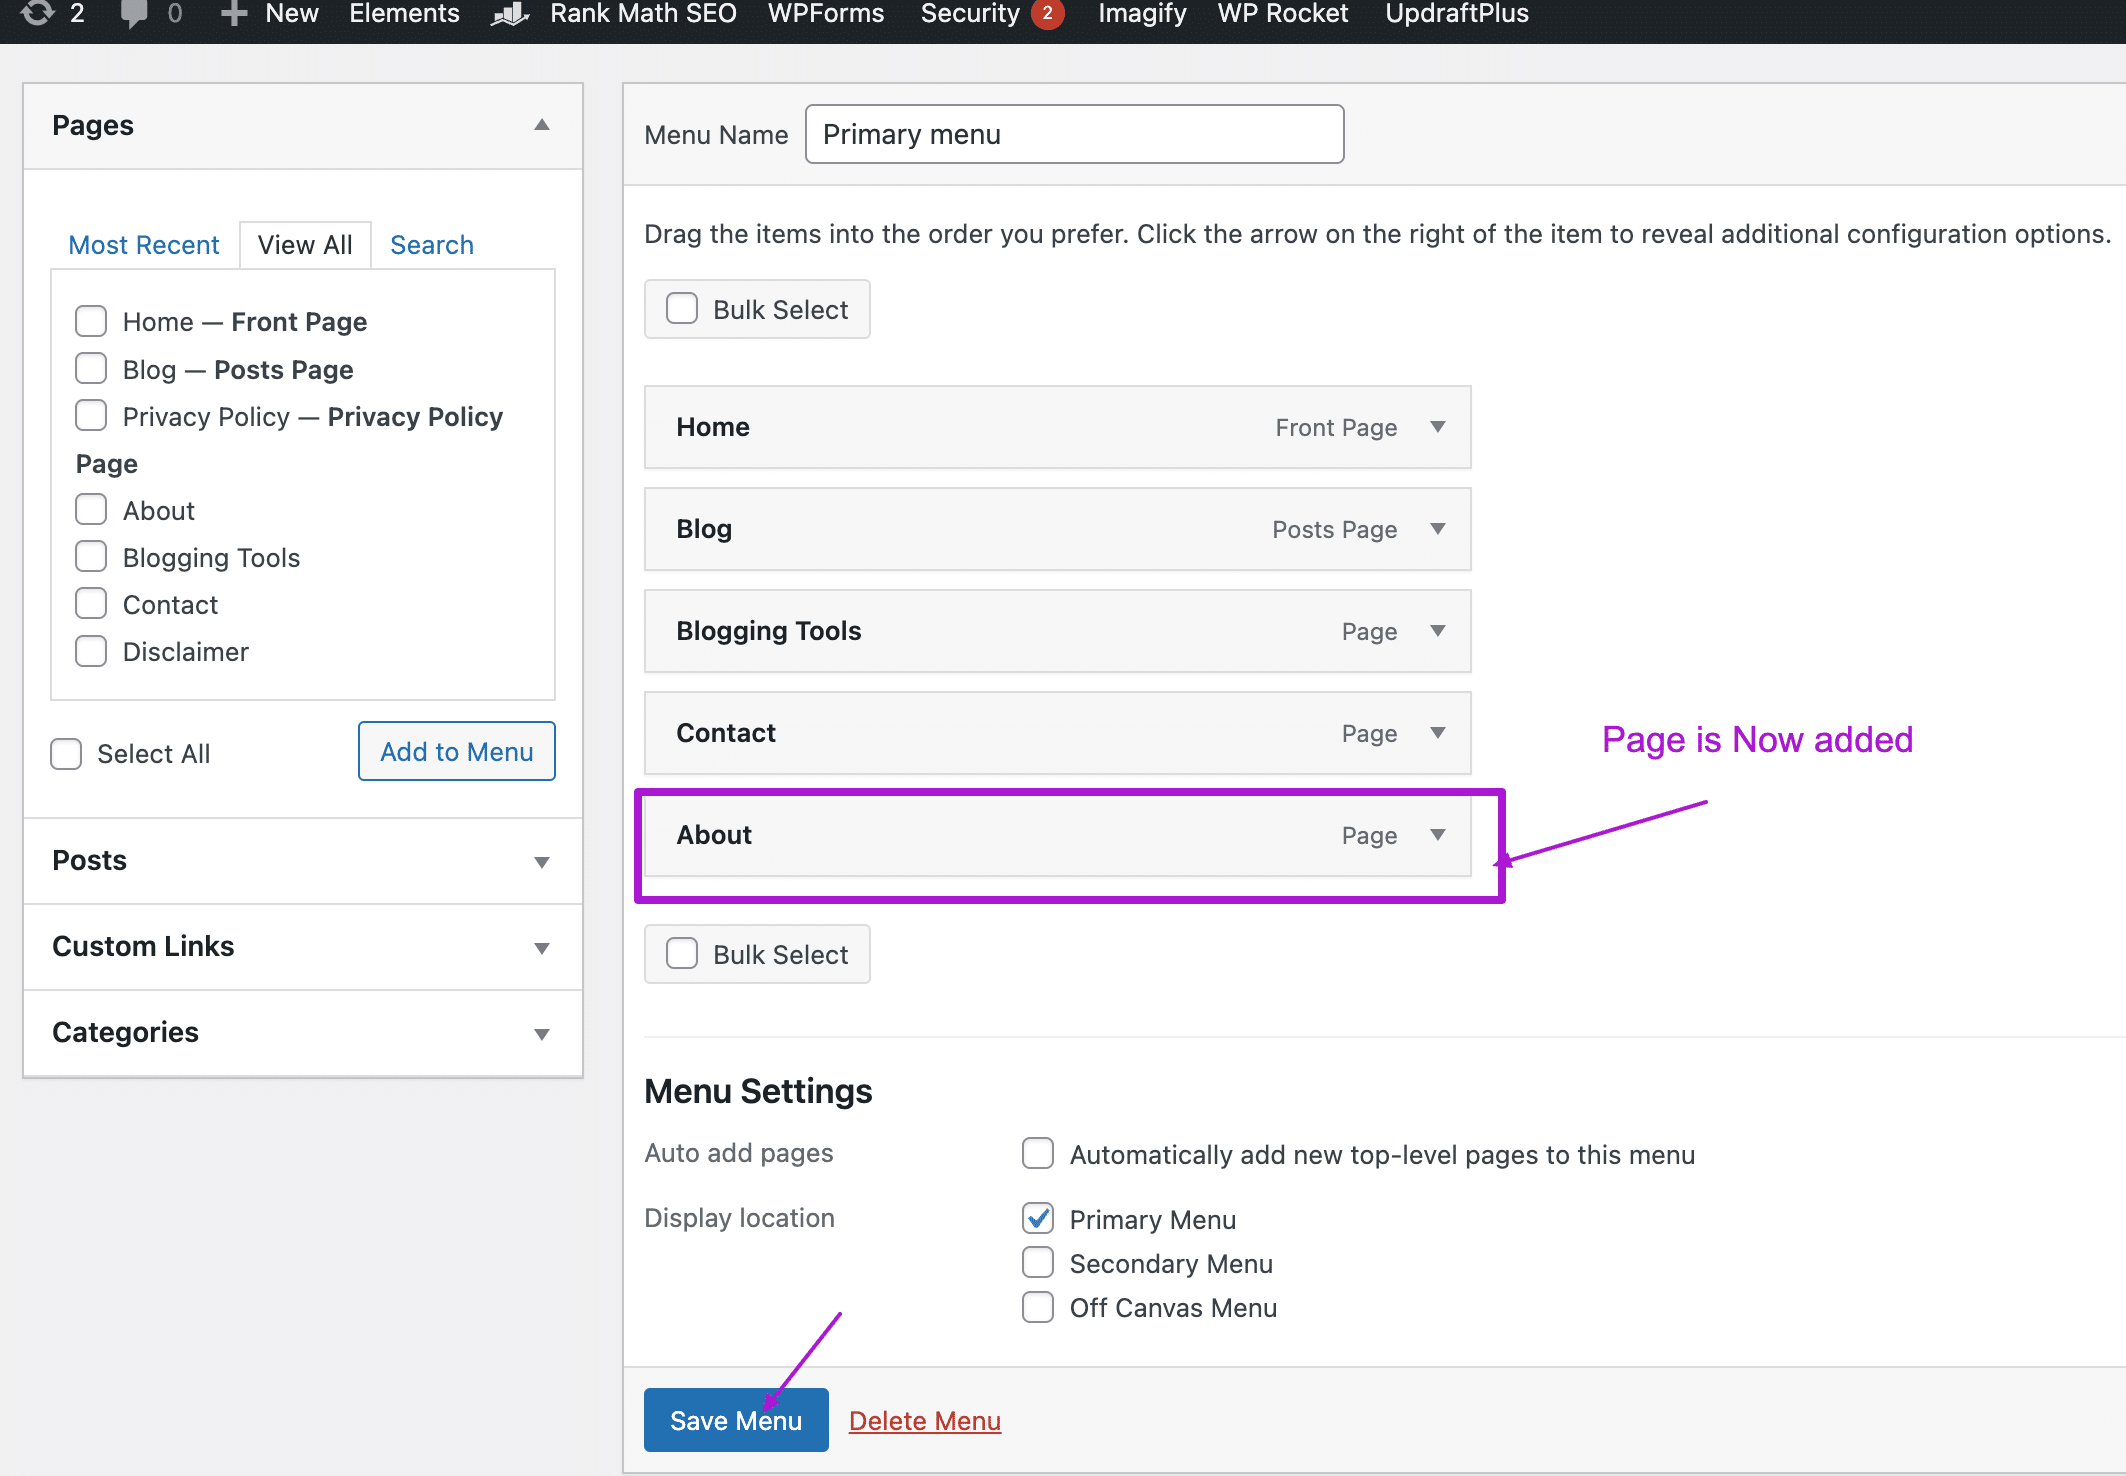
Scroll to menu settings and select the location where you want to display your menu in WordPress.
The display location may vary from theme to theme. Select the primary menu and it will add your navigation menu at the top header. You can change the menu location anytime.
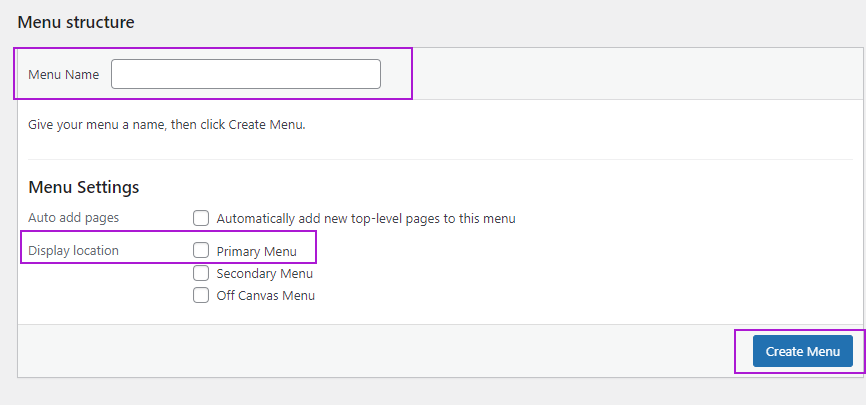
Next, hit the “Create Menu” button.
2) Add Menu Items
Now you have created your first menu, but it is blank. To add links to your menu, you have to add menu items. You can add pages, posts, categories, and custom links to your navigation menu.
How to Add Pages to Menu on WordPress?
Pages menu items allow you to add page links to your navigation menu. This helps you to display your top pages in the navigation.
For example, you can add home, about us, contact us, services, or any other page to your navigation menu.
Here is how to add pages to the menu on WordPress:
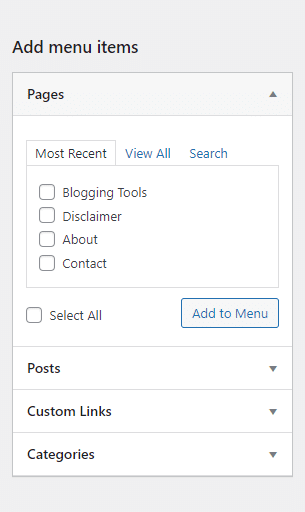
- Under your menu editor, navigate to “Add menu items” and open the “Pages” drop-down from the left side.
- Select “View All”.

- From here, select the pages which you want to add to your navigation menu.
- Click on the “Add to Menu” button.
- Now you’re selected page will be added to the menu and click “Save Menu“
How to Add Posts to the Navigation Menu?
You can also add important posts to your navigation menu, and this is quite helpful for your reader to easily find the most important content on your website or blog.
Here are the steps for how to add posts to the navigation menu:
- Under the menu editor, open the post’s drop-down from the left side of the menu editor.
- Select “View All“

- Select the posts which you want to add to your navigation menu.
- Hit the “Add to Menu” button.
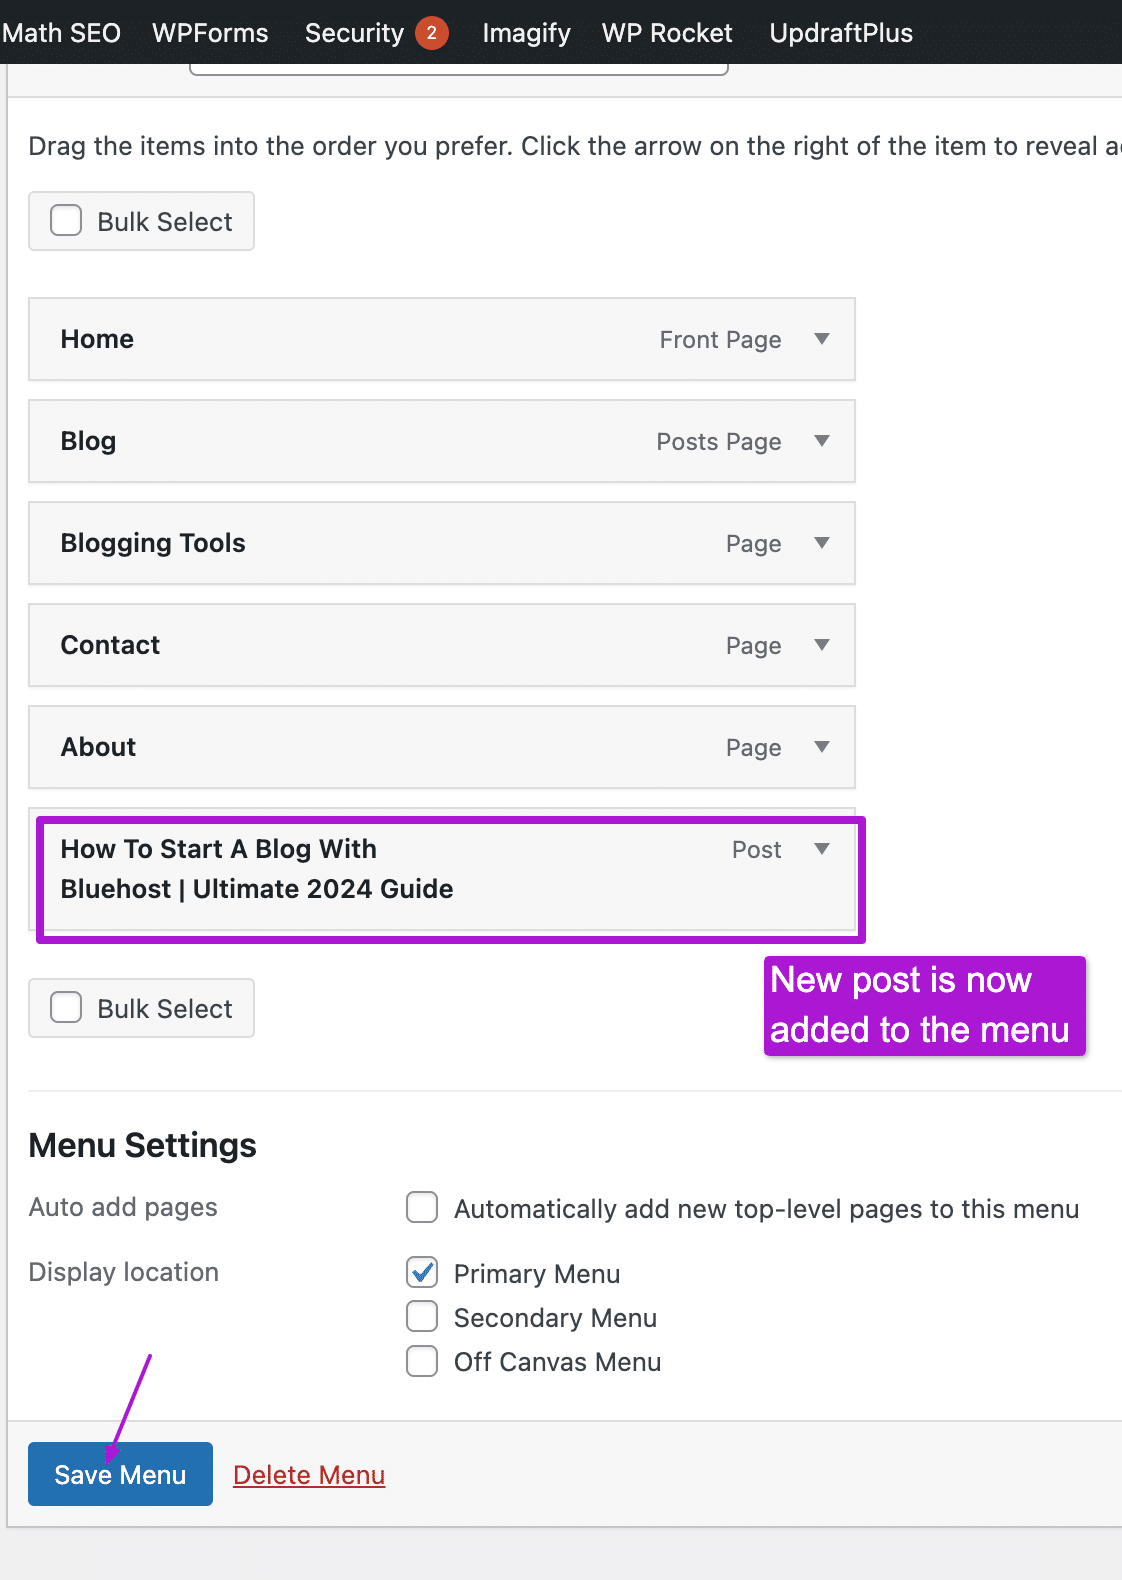
- Now your post will be added to the menu and click “Save Menu“.
How to Add Custom Links to WordPress Menu?
Custom links allow you to add internal or external links to your navigation menu.
For example, if you want to add your social profile links to your WordPress navigation menu, then you can use custom links.
Here is how you can add custom links in the WordPress navigation menu:
- Under the menu editor, navigate to custom links and open the dropdown menu.
- Enter the destination URL in the URL box.

- Enter the display text in the link text box.
- Hit the “Add to Menu” button.
- Click on save changes.
How to Add Categories in WordPress Menu?
Categories are used to organize posts into different sub-topics so that users can easily find out relevant content.
Many bloggers display categories in header navigation to showcase their content in front of their readers.
Here is how you can add categories in the WordPress navigation menu:
- Under the menu editor, navigate to “categories” and open its dropdown.
- Click on “View all“

- Select the categories which you want to add to your navigation menu.
- Hit the add to menu button.
- Save Menu.
3) Reorder Menu in WordPress
Now you have added different menu items and the next step is to reorder your menu items to make them look better.
You can easily organize your menu items by just dragging and dropping specific menu items. Here is how you can reorder the menu in WordPress:
- Hover over the menu item which you want to reorder.
- Drag the menu item and drop it where you want to arrange it.
This is how you can reorder your menu items to organize your navigation menu.
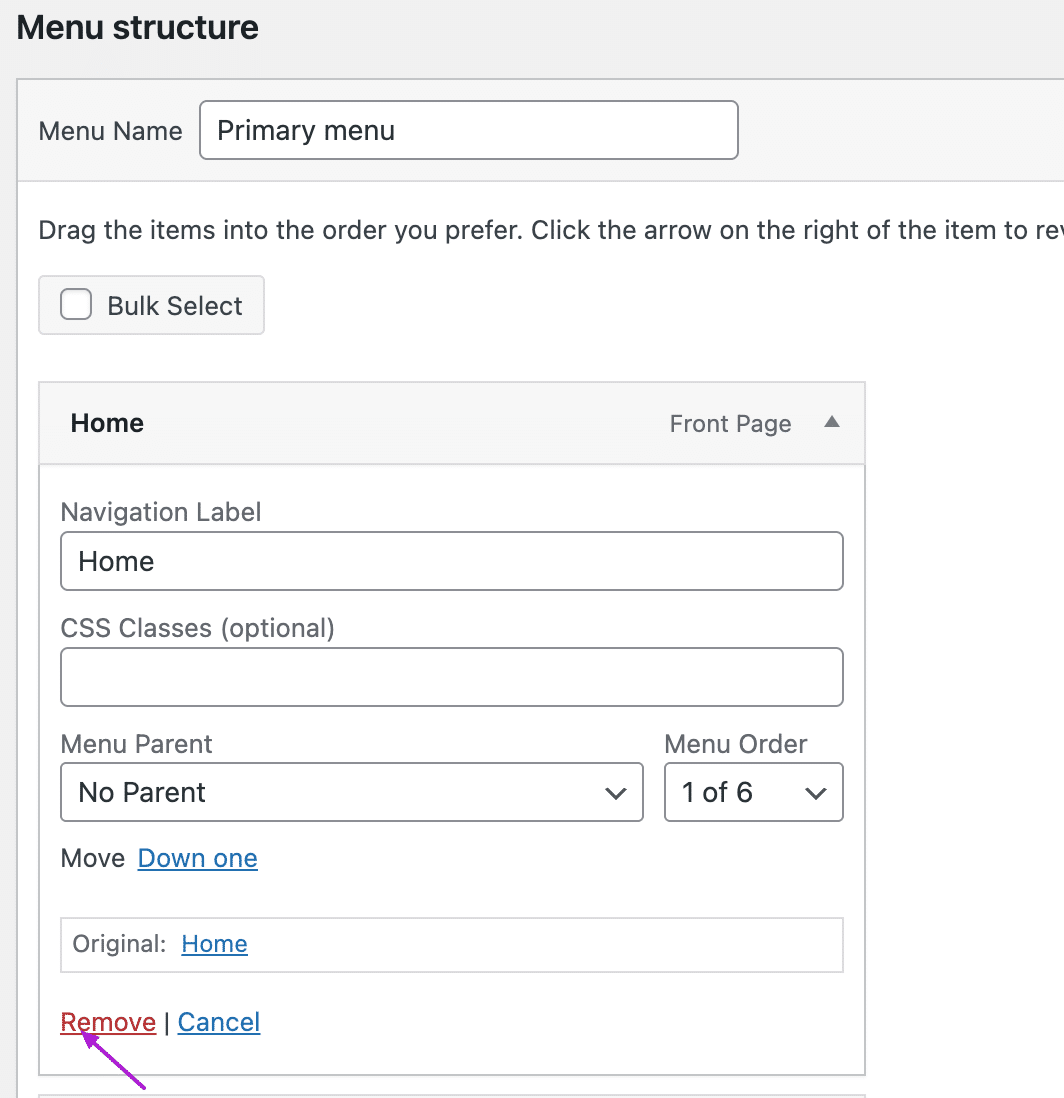
4) Customize Menu Items
You can also edit menu items as per your custom needs and requirements. Following are the steps to edit menu items:
- Open the menu item dropdown which you want to edit.
- From here you can edit the menu item fields.
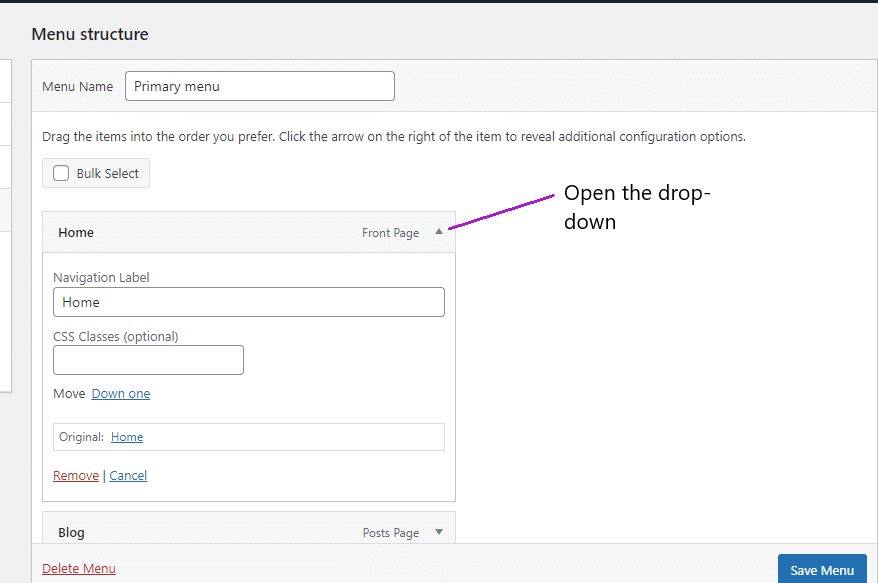
- After making changes, hit the save button.
You can edit the following fields for your menu items:
Navigation label: Enter the name of a menu item which you want to display. For example, if you have added a blog page to your navigation menu, then by default the navigation label shows the name of your blog page.
But if you want to give a custom name to it, then simply erase the existing navigation label and enter your desired navigation name.
For example, you can remove the existing label of the blog page and replace it with something unique like Read my blog, All posts, or anything as per your taste.
CSS classes: Add custom CSS classes to design your menu items.
How to Remove Menu Items?
If you have added the wrong menu items and want to remove them, you can easily remove that menu item in a few seconds. Here are the steps to remove menu items:
- Open the dropdown of the menu item which you want to remove.
- Hit the remove button from the bottom.
- Save changes.
This is how you can remove unnecessary menu items.
5) Add Navigation Menu in WordPress
After creating and customizing your navigation menu, your last step is to add a menu in different locations of your WordPress website to make your website easy to navigate. You can add a navigation menu in WordPress sidebars, footers, pages, and posts as well.
How to Add Navigation Menu in WordPress Sidebar?
Using a widget, you can add a navigation menu in the WordPress sidebar. So, here is how to add navigation menu in WordPress:
- Navigate to “Appearance” and select “Widgets”.

- This will open the widgets editor and from here you can manage different widgets for your WordPress website or blog.
- Open the right sidebar or left sidebar widgets in which you want to add a menu.
- Click on the “+” icon and search the navigation menu block.
- In the title box, you can add the desired name and it will display at the top of the navigation widget in the sidebar.
- Select the menu that you want to display on the sidebar. It will show you a list of all menus that you have created. Choose the one that you want to add to the sidebar.
- Click on the update button.
How to Add Menu in WordPress Footer Bar?
Many websites or blogs display menus in the footer bar as well, and here is how to add a menu in WordPress footer bar:
- Navigate to Appearance — > Widgets.
- Select the footer widget or bar as per your needs. E.g.: Open the Footer bar dropdown.
- Click on the “+” button and add the navigation menu block.
- Enter the title of your block in the title box. For example, Quick links.
- Select the menu that you want to display at the footer bar.
- Click on the update button.
This is how to add a menu in WordPress footer bar.
How to Add Submenu in WordPress?
Creating a submenu or drop-down menu in WordPress is not a hard task.
All you need to do is drag-and-drop sub-items to create the desired submenu or dropdown menu in WordPress. Here is how to add a submenu in WordPress:
- Navigate to Appearance → Menu.
- Create a new menu or select the existing menu to edit.
- Add the desired pages, posts, custom links and categories.
- Organize the menu items in the desired order.
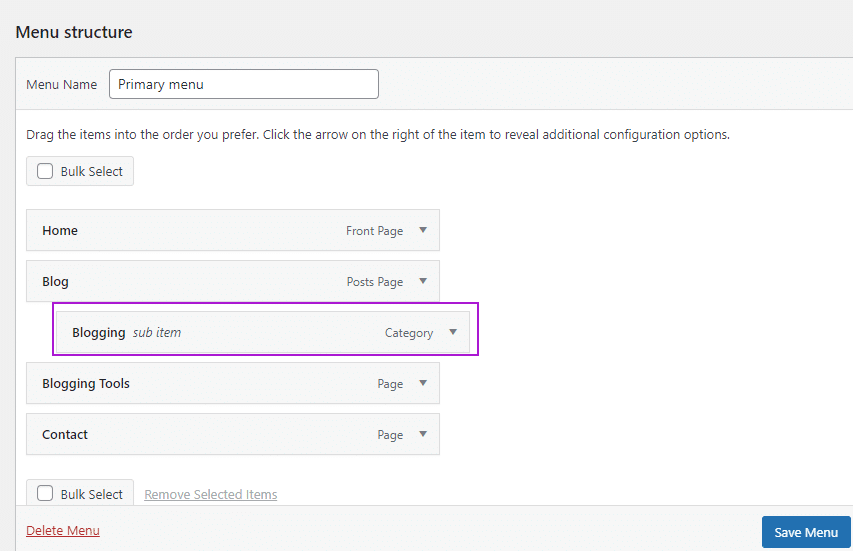
- Now, drag the menu item which you want to make a sub-item. For example, if you want to display your categories under the blog menu, then drag categories one by one and drop them underneath the blog menu.
- Hit the save button.
This is how you can easily create a dropdown menu in WordPress.
How to Delete Menu in WordPress?
If you’re no longer using a menu, then it is a great idea to delete that menu from your WordPress. Here is how to delete the menu in WordPress:
- Navigate to Appearance → Menus.
- Select the menu from the top of the page that you want to delete.
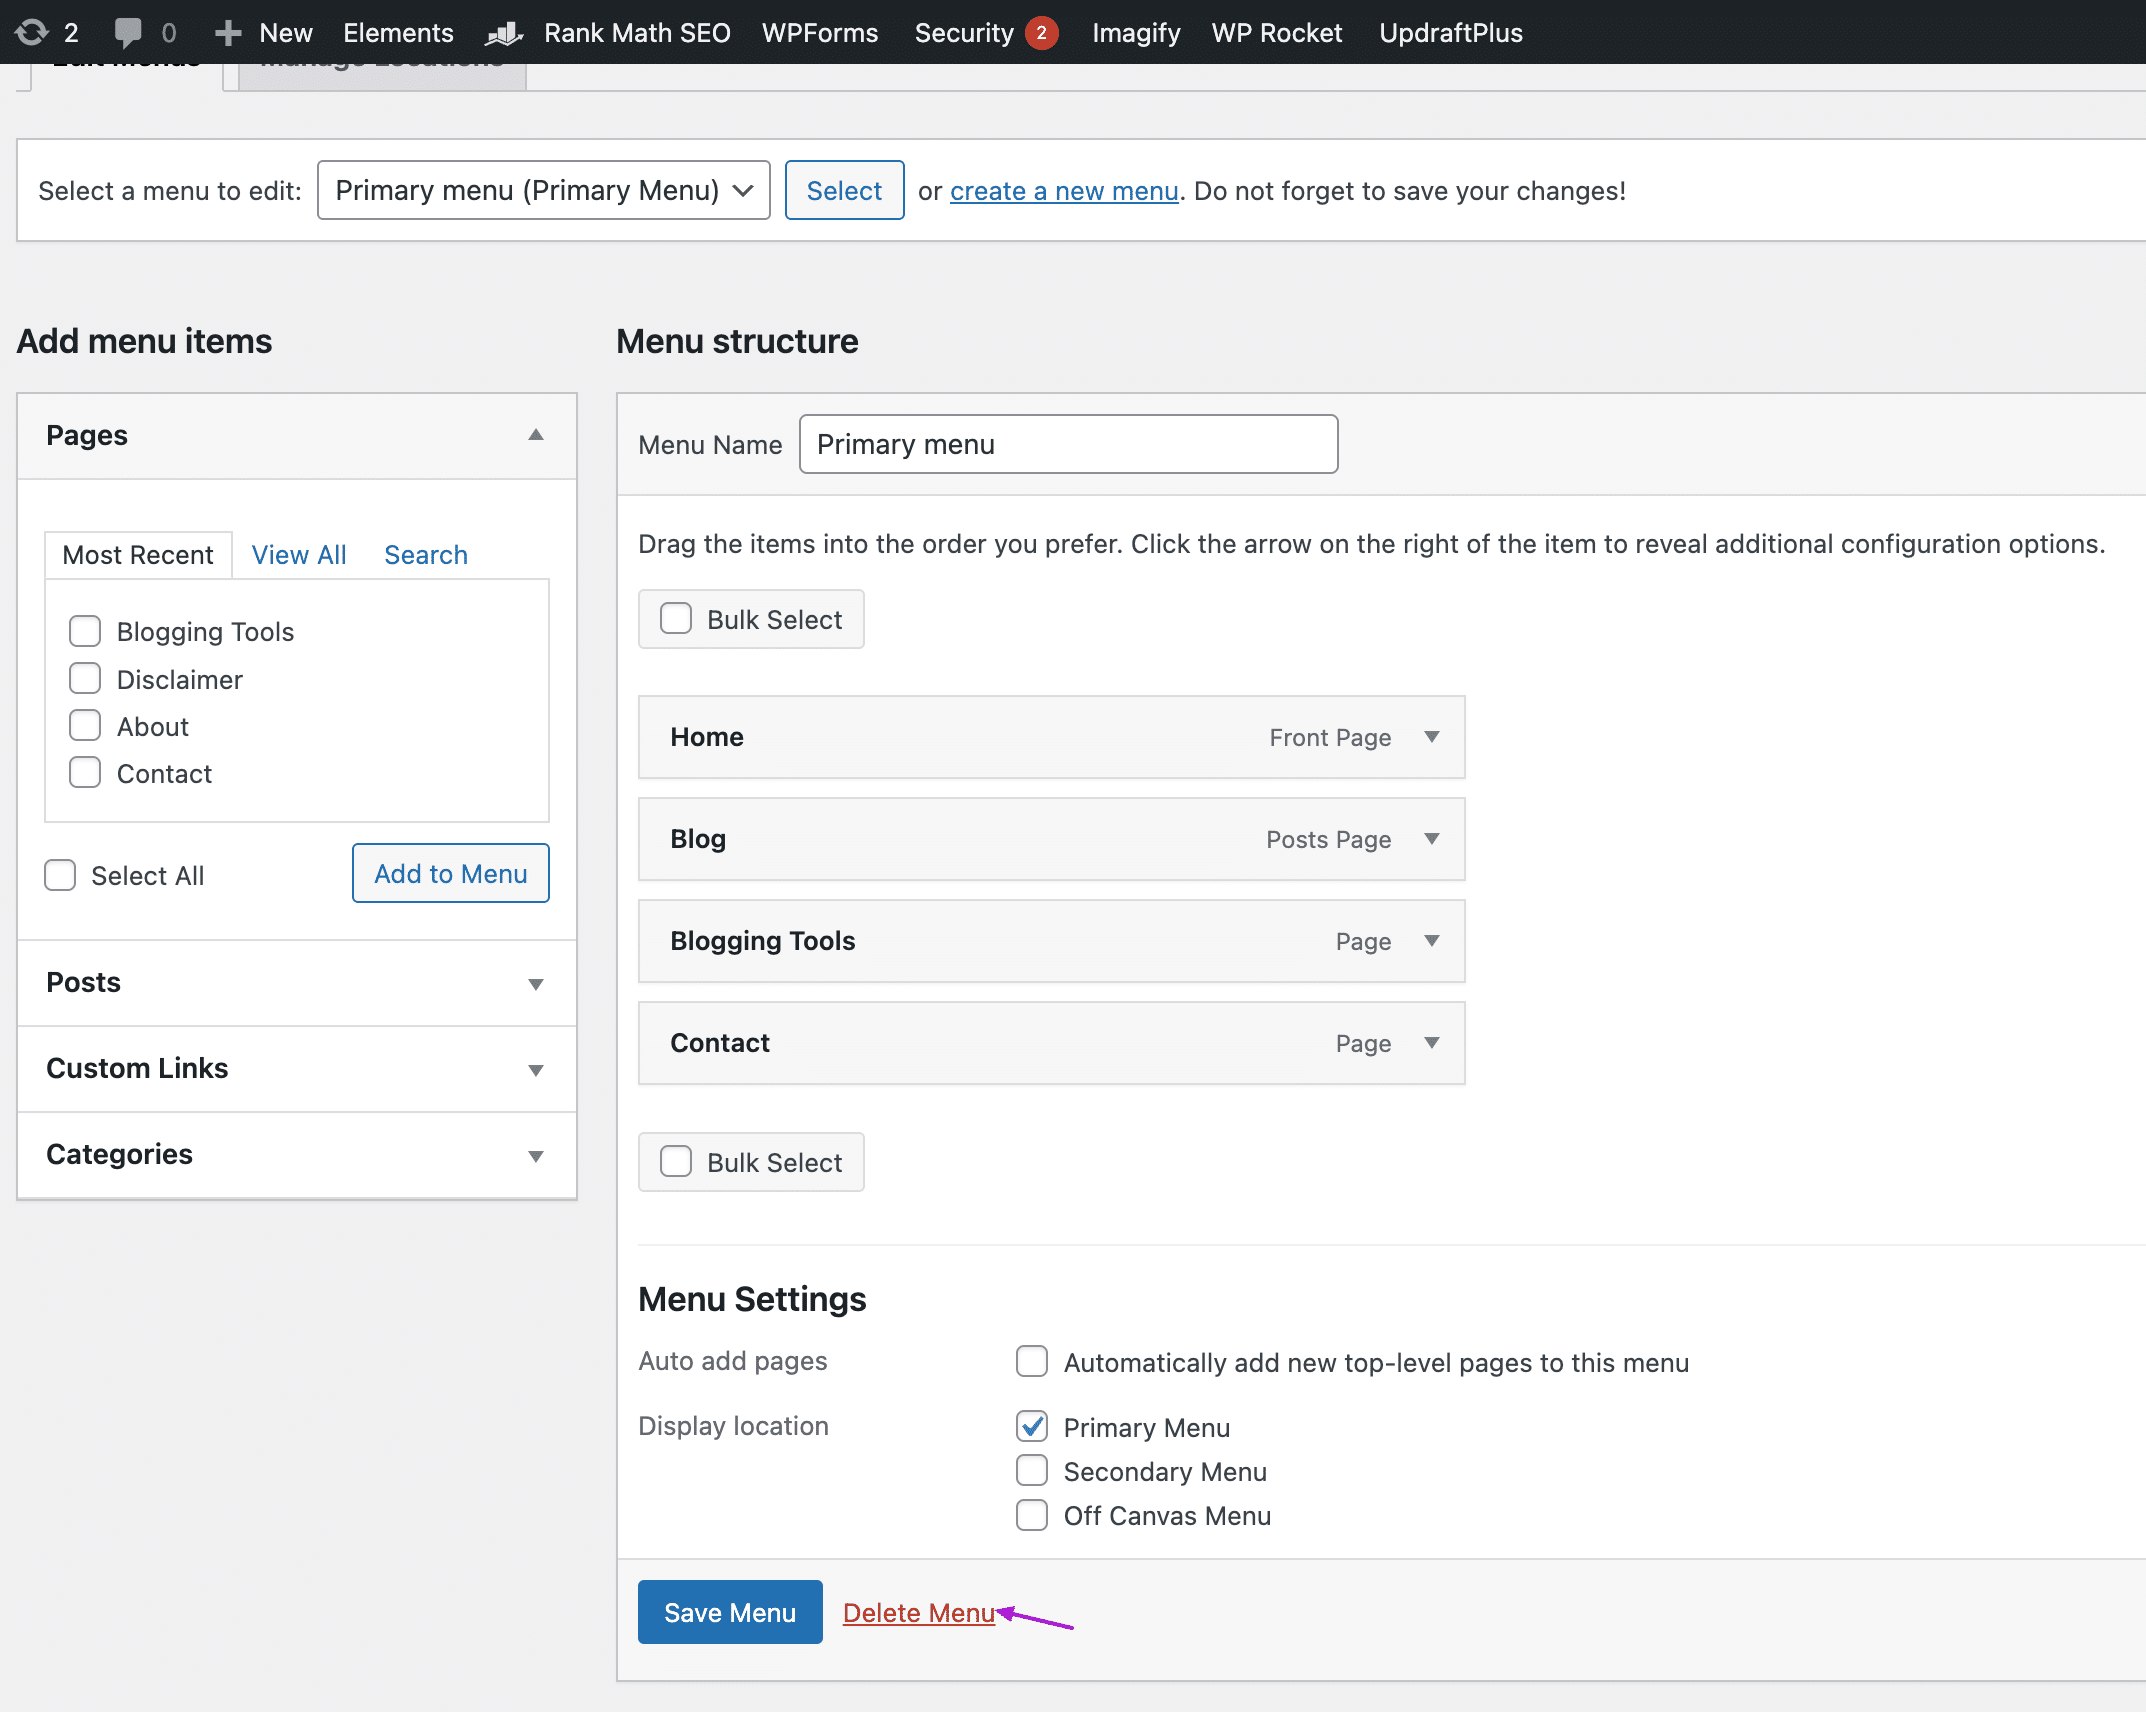
- Scroll down and select the “Delete Menu”.
- Click “Ok” to confirm.
This is how you can delete menus in WordPress.
Final Thoughts
I hope now you know how to add a menu in WordPress. Follow these steps to add a navigation menu and customize menu items as per your taste.
Then add menus to the sidebar or footer bar. After doing all these steps, have a look at your website to see how your navigation menu looks.
If you have any questions, feel free to discuss them in the comment section.