Adding a new page in WordPress is not a very hard task. Because with a few mouse clicks, you can easily add a new page in WordPress. However, beginners may face difficulties and have questions like how to add a new page in WordPress.
Are you also struggling to add a new page in WordPress? Perfect! So, without wasting much time, let’s directly jump into it.
How To Add A New Page in WordPress?
To add a new page in WordPress, navigate to your WordPress dashboard, go to “Pages” and choose “New Page”. This is how easily you can add a new page in WordPress.
Steps To Add A New Page in WordPress
Here is a detailed walkthrough for how to add a new page in WordPress.
Step1: Login to WordPress
Navigate to your WordPress admin panel and log into it by entering your WordPress username and password.
Step 2: Add A New Page
Hover over “Pages” from the left navigation bar and then select “Add New”.
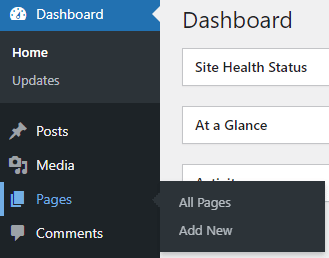
This is how to add a new page in WordPress.
Step 3: Write Content For Your Page
Now, you will see a WordPress editor where you can create your page. This editor is called a Gutenberg block editor.
Firstly, enter the title of your page. E.g. about us. Then write content for your page.
To add content to your page, the Gutenberg block editor provides you with many blocks. Using these blocks, you cannot only add content but also properly organize your page’s content. You can add any block by clicking on the + icon from the top or right side of your editor( as shown in the screenshot below).
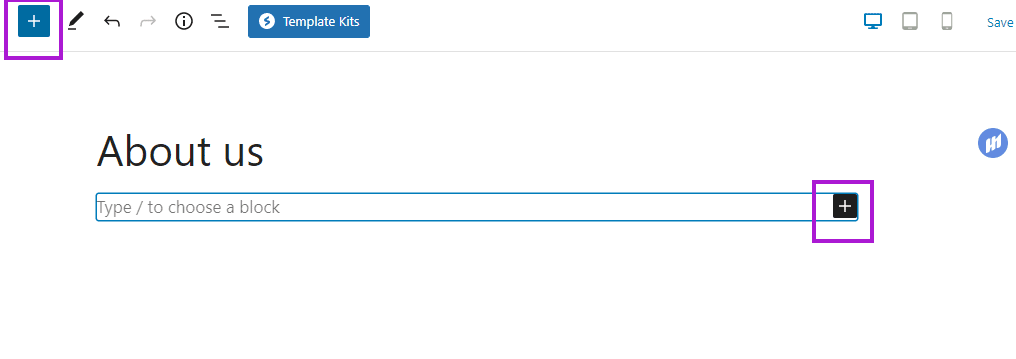
To see blocks, navigate to the top bar of your Gutenberg editor and click on the “+ “icon. From here you can see all the blocks which you can use to add content to your page. Here are the most commonly used blocks:
- Paragraph: To add content as paragraphs.
- Heading block: To add different headings such as H1, H2, H3, H4, H5 and H6.
- List block: To add numbered or bullet lists.
- Image block: To add images to your page.
- Table block: To add content as rows and columns.
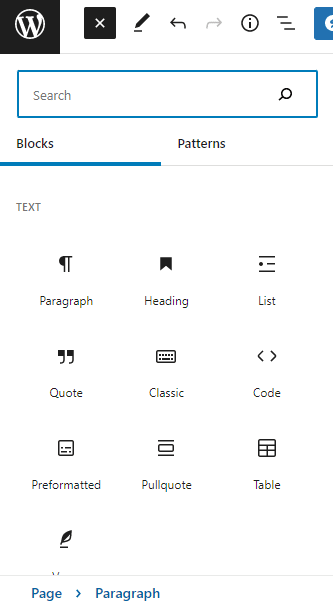
Each block comes with settings and after adding a block to your page, you can customize the block’s settings as per your needs.
E.g., Let’s add a paragraph “This is my First WordPress Page”. Now, click over the paragraph block to see basic settings. For more settings, go to the “Settings” icon from the top and then choose block settings.
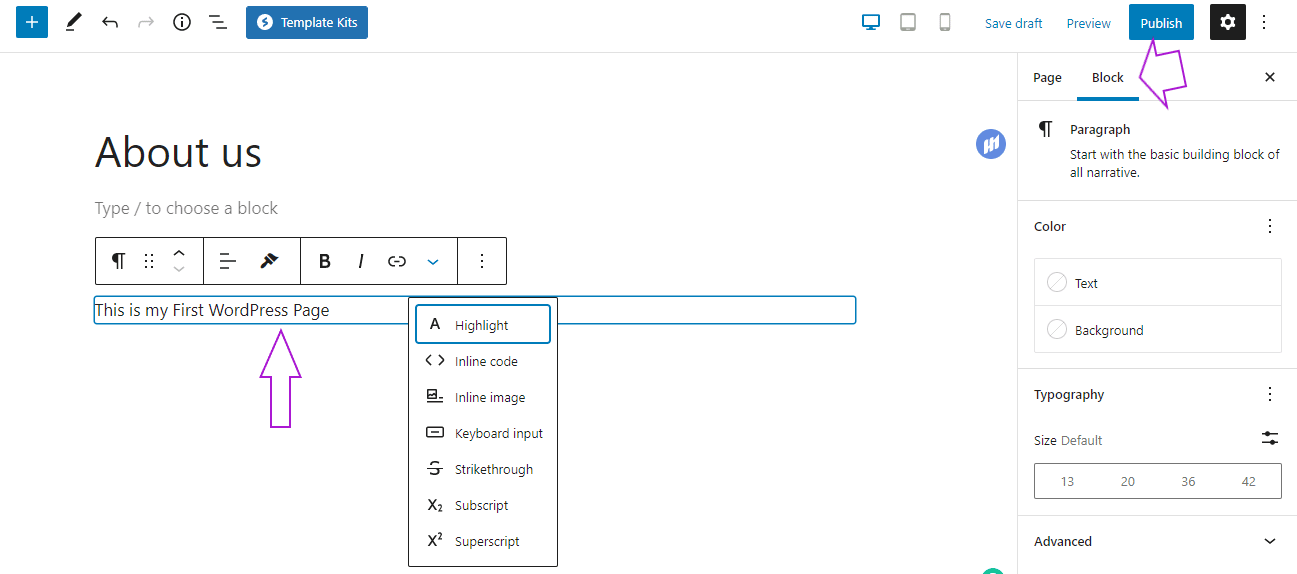
This will show you the settings that you can change for your paragraph block. Therefore, blocks are so useful as you can customize settings for each block as per your specific requirements.
By default, the Gutenberg block editor comes with many blocks that you can use to quickly format, design and organize your page’s content. But if you want to use more blocks, then you can use additional plugins like Spectra.
Spectra Plugin is previously known as the ultimate addon for Gutenberg. Using this plugin, you can add an info box, call to action, FAQ, content timeline, inline notice, table of content,s and many more blocks to your page.
To add a Spectra plugin: Go to plugins → Add new plugins – Search for “Spectra” – Install and activate the plugin.
Now you will see Spectra blocks within your Gutenberg editor and from here you can easily add these blocks as well.
Step 4: Customize WordPress Page Settings
Once you’re done adding content for your page, the next step is to customize the page settings as per your needs. Let’s have a look at how you can do that!
Navigate to the top of the Gutenberg block editor, click on the “Settings” icon and now go to the “Page” section. From here, you can customize all the settings for your page.
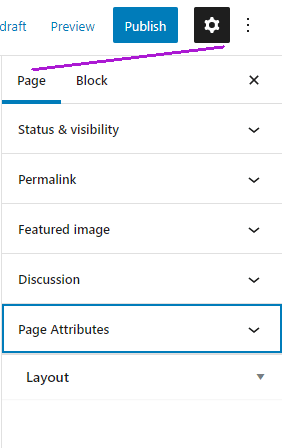
Status and Visibility Settings
Visibility: You can choose either a public, private, or password-protected option.
- Public: If you want everyone to see your page, select it as public.
- Private: If you want only admins or editors to see your page, select private.
- Password protected: To lock your page with a password, select password protected and people who have a password can access your page.
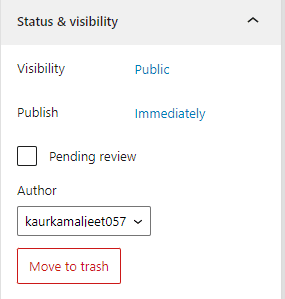
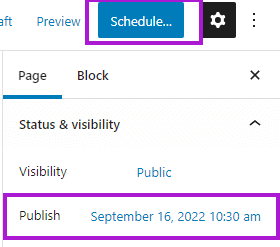
Publish: From here you can choose a date and time when you want to publish your page. To schedule a page, click on “Immediately” and then select the date and time when you want to schedule your page to go live.
If you don’t want to schedule your page in the future then keep your publish settings as immediately.
Author: This option is useful when multiple authors are working on the same WordPress website. From here you can select an author under whose name you want to publish a page.
Move to Trash: To delete your page, you can hit the move to trash button.
Permalink
It is a very important setting from the SEO point of view. The permalink is the URL of your page. The starting URL of the page will remain the same as per your general permalinks settings and, for individual pages, you can edit the last part of the URL, which is called a slug.
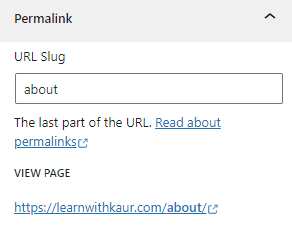
Instead of using numbers or random strings for your slug use meaningful words or SEO keywords in the slug if you’re optimizing your page for SEO.
For example, if you’re creating an about us page, then in the slug you can remove a random string and enter about us. This will help your users and search engines to better understand your page’s content.
Featured image
This image works as a banner image for your page. So, add an image that is related to your page’s content.
E.g.: For the About Us page you can add an image that represents your personal or business brand. Featured images can appear on social media or other platforms whenever you or others share your page’s link.
Discussion Settings
From here, you can choose whether you want to turn ON/OFF comments for your page. If you want to Turn ON the comment section for your page, select allow comments. Otherwise, keep it unchecked.
Page Attributes
This setting allows you to add a page under some other page. Like if you want to publish the “Our Team” page under the “About Us” page. Then you can use this setting to do so.
These are the main page settings that come by default with the Gutenberg block editor. Apart from this, you may see other settings as per your specific theme or if you’re using any additional plugins to enhance your page’s settings.
Step 5: Save Draft and Preview Page
Once you’re done writing and customizing the page settings, hit “Save draft” to save your entire work. After saving the work, you can also preview your page to see how your page will look after publishing.
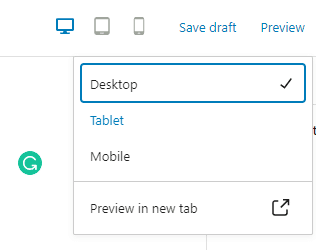
To preview your page, navigate to the top bar and click over the “Preview” button.
You can also preview pages for different devices such as a desktop, tablets, and mobile. Preview your page on all these devices and make sure everything looks perfect on different devices.
If something looks wrong on any devices, edit that. Once you’re happy with your page’s appearance on all devices, hit the save draft to save changes if you made any.
Step 6: Publish or Schedule Your Page
Now the last step is to publish or schedule your page. If you have selected a future date from the status and visibility settings, then you will see the schedule button at the top bar. So, click on the “Schedule” button and your page will go live on the selected date and time.
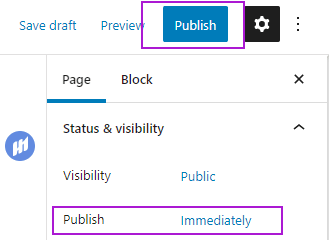
If you have selected no scheduling date, then you will see a publish button. Once you are all set, hit a “Publish” button from the top of your page and your page will immediately go live on your website or blog.
Final Thoughts
This is how to add a new page in WordPress. I hope now you will clearly understand it.
Have questions? Ask in the comments.
